Creating AWS Databricks Classic Workspace
In this lecture, let's create a Databricks classic workspace on AWS.
There are several ways to do this, but the easiest and most convenient path is directly from your AWS account console, via AWS Marketplace.
Step 1: Start From Your Existing Subscription
Log in to your AWS console, go to AWS Marketplace → Manage subscriptions, and you should see your existing Databricks Data Intelligence Platform subscription (created in an earlier lecture). Click Set up product, and then Set up your account.
At the bottom, it will prompt you to create an account — but we already created our Databricks account in the previous lecture, so all we need to do is link that same account. Click Create account; if a new tab opens asking you to log in, and you're already logged in, it will simply take you to the serverless workspace you created earlier. That's expected — just close that tab and come back.
You should now see confirmation that your Databricks account was successfully linked. Click Next — this is where we start creating the actual classic workspace.
Step 2: Choose Your Region
First, select your AWS region. Since we've been using US East (N. Virginia) for everything in this course, that should already be the default — if not, select it explicitly.
Step 3: Configure Storage and Compute Access
This next part directly maps to the classic workspace architecture we covered earlier — recall that a classic workspace needs a workspace storage bucket in your cloud account, plus cross-account IAM roles so Databricks can access that storage and manage compute on your behalf.
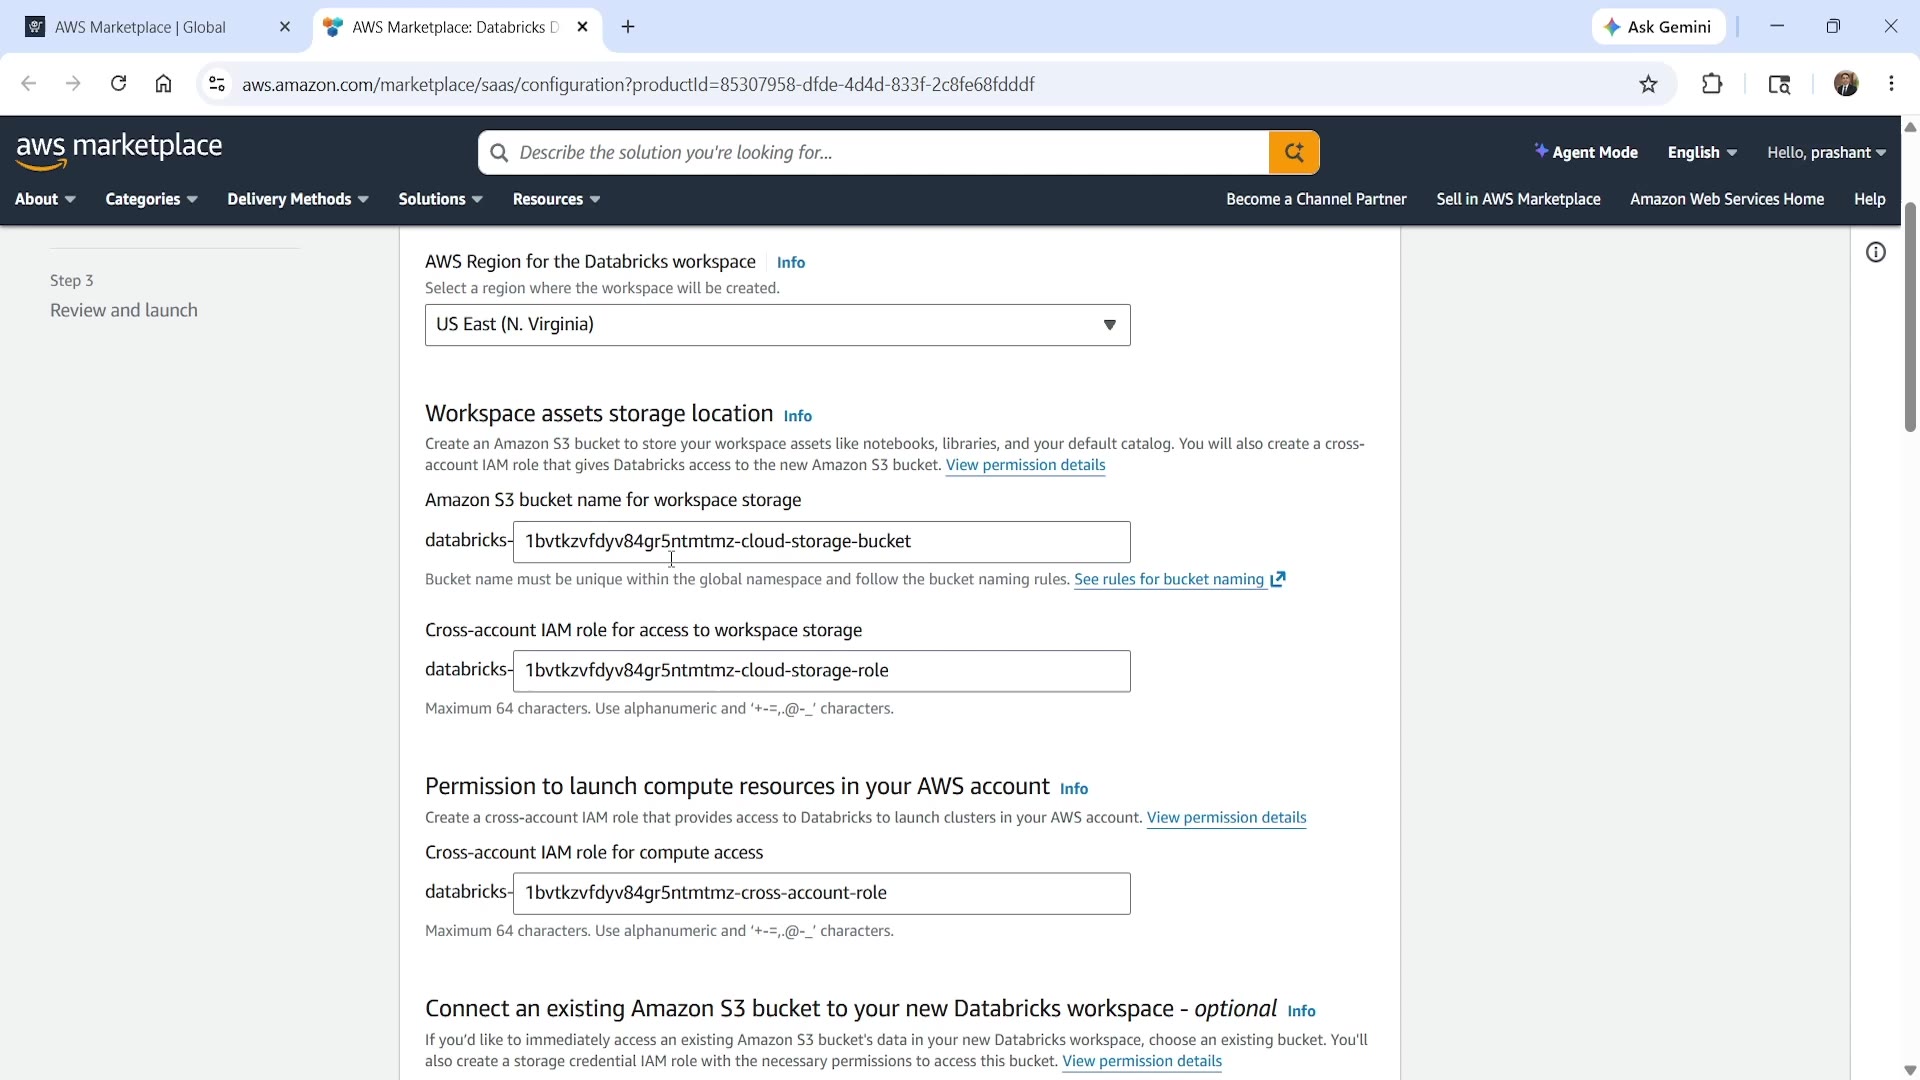 Classic workspace configuration fields
You'll be asked for:
- Amazon S3 bucket name for workspace storage — this is the actual storage bucket that will live in your AWS account.
- Cross-account IAM role for access to workspace storage — the role that lets Databricks read and write to that bucket.
- Cross-account IAM role for compute access — a separate role that lets Databricks launch and manage the dedicated clusters running in your account (this is the "classic compute plane" from the architecture).
The wizard auto-generates sensible default names for all of these — you can accept the defaults, which is what we'll do.
You'll also see an optional step: Connect an existing Amazon S3 bucket. If you already have data sitting in an S3 bucket, you can link it here so Databricks can access it directly. If not — like in our case — you can simply skip this. It's not required, and you can always do it later. The only mandatory bucket is the workspace storage bucket from the step above.
Step 4: VPC Resources
Next, the wizard explains that it will create the networking resources needed for Databricks' cloud account and your AWS cloud account to communicate securely. This includes:
- A Virtual Private Cloud (VPC)
- A NAT Gateway (with a static IP)
- An Internet Gateway
- An Endpoint
- A Security Group
- Three subnets and two routing tables
All of these get deployed directly into your AWS account — and you're billed for them by AWS (more on this below, since a couple of these have an ongoing cost).
Step 5: Review the Permissions
Before launching, you'll be asked to review exactly what permissions you're granting Databricks to create and manage in your AWS account. This boils down to the two cross-account IAM roles from Step 3:
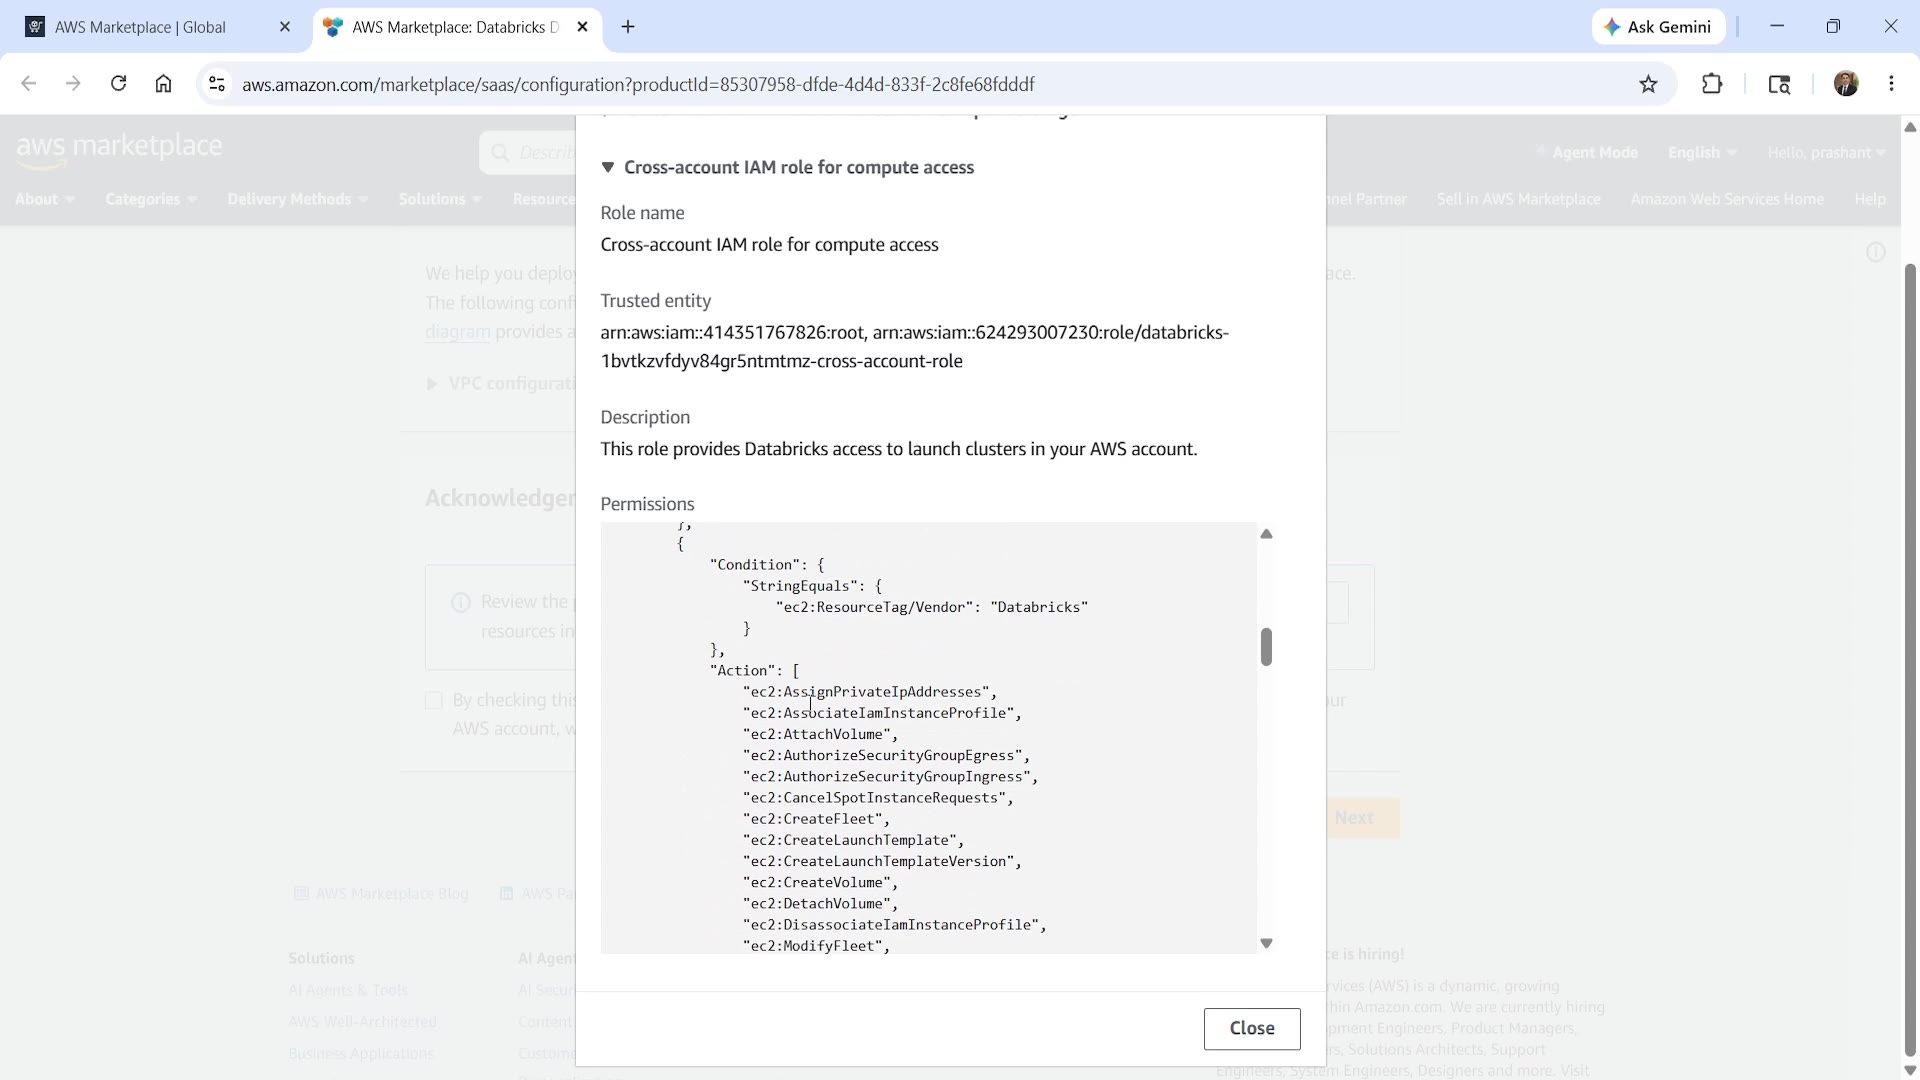 Cross-account IAM role permissions detail
- The storage role grants S3 permissions —
GetObject,PutObject,DeleteObject, and similar — so Databricks can manage the workspace storage bucket. - The compute role grants EC2 permissions —
CreateFleet,CreateLaunchTemplate,CreateVolume,AssignPrivateIpAddresses,AssociateIamInstanceProfile,AttachVolume, and more — everything Databricks needs to launch and manage dedicated clusters in your account.
Once you've reviewed these, check the acknowledgment box confirming that you're granting Databricks permission to create these resources — and that doing so may incur incremental AWS charges. Click Next.
Step 6: Review and Launch
On the final screen, review everything you've configured, then click Launch.
This step takes up to 5 minutes — it's creating around 27 resources in your cloud account. Feel free to pause here and check back once it's done.
Step 7: Launch Complete
Once finished, you'll see a Launch summary, confirming everything that was created:
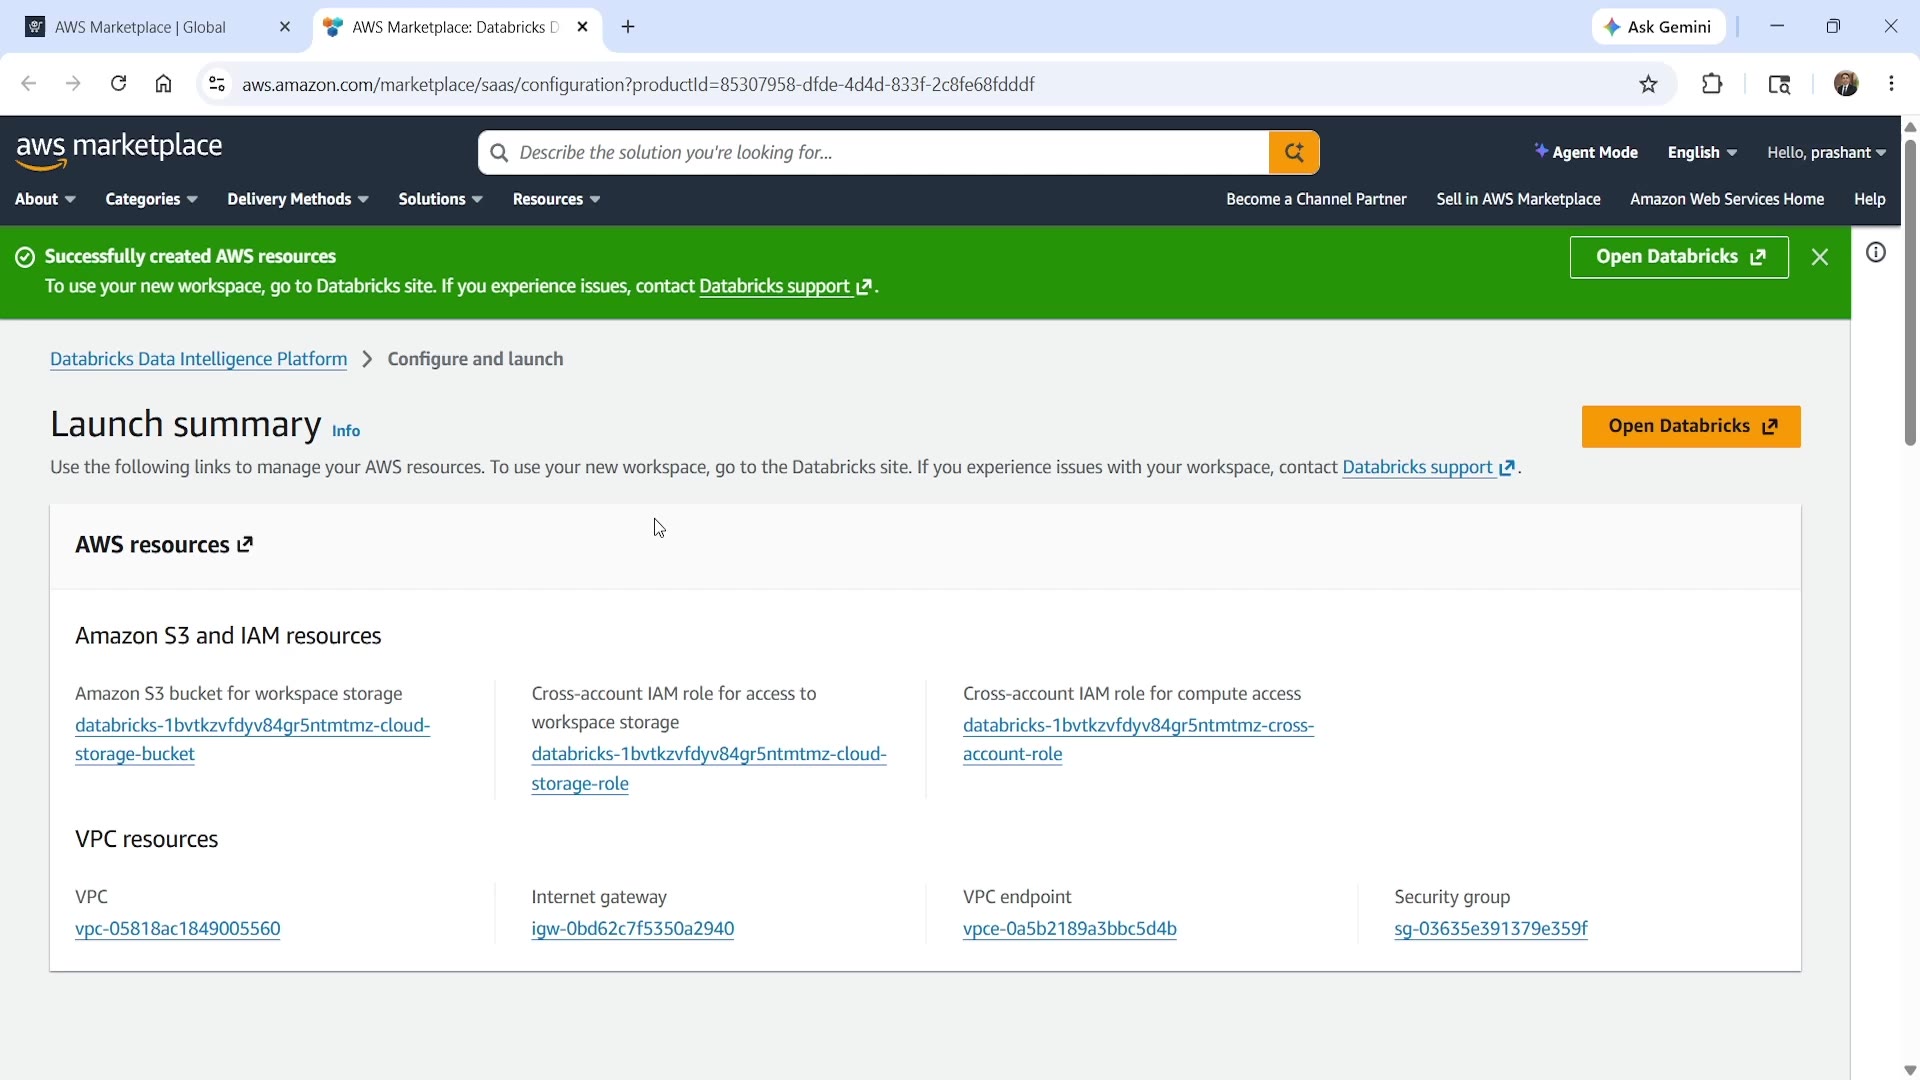 Classic workspace launch summary
This includes your S3 bucket, both cross-account IAM roles, and your VPC resources (VPC ID, Internet Gateway, VPC endpoint, and Security Group) — each with a link so you can inspect them directly in AWS if you'd like.
Important: the wizard usually opens your new Databricks workspace automatically in a new window. If it doesn't, click Open Databricks here manually. Make sure you open the new workspace at least once — if you never do, the launch process won't be considered complete.
Step 8: Confirm It's a Classic Workspace
Once opened, you'll land in your Databricks account management console, where you should now see a second workspace listed (alongside your original serverless one), already attached to your metastore. Click into it and open it.
To confirm you're actually in the classic workspace (and not the serverless one), go to Compute. If you see an "All-purpose compute" section with a Create compute button, you're in the right place — this is the giveaway, since this option is specific to classic workspaces.
Important: Watch Your Ongoing Costs
Here's something to keep in mind: unlike a serverless workspace, a classic workspace does have an ongoing cost, even when you're not actively using it.
Specifically, two of the resources created during setup — the NAT Gateway and its static IP address — carry a daily rental cost, roughly $1/day. That might sound small, but it adds up: keeping the workspace around for 15 days would cost you about $15, just for existing, regardless of whether you actually run anything on it.
Recommendation: if you're not actively using your classic workspace, clean it up (delete it) when you're done with a given session or topic. You can always recreate one later whenever you need to practice something that specifically requires classic compute.
Summary
| Step | What You Do |
|---|---|
| 1 | From your AWS Marketplace subscription, link your existing Databricks account |
| 2 | Choose your AWS region (e.g., US East - N. Virginia) |
| 3 | Configure S3 bucket name + two cross-account IAM roles (storage, compute) |
| 4 | Review the VPC resources that will be created |
| 5 | Review and acknowledge the permissions being granted |
| 6 | Launch (takes ~5 minutes, creates ~27 resources) |
| 7 | Open the new workspace at least once to complete setup |
| 8 | Confirm it's classic via Compute → All-purpose compute |
| Ongoing | NAT Gateway + static IP cost ~$1/day — clean up when not in use |
In the next lecture, we'll cover exactly how to do that cleanup.
See you again. Keep learning, and keep growing!