Creating AWS IAM User Account
In this lecture, let's create an IAM user in AWS, and use that for our day-to-day work instead of the root user.
Why We Need This
In the previous lecture, we created our AWS account and secured the root user with MFA. But as a rule, you should never use the root user for daily work — it's the account owner, with unrestricted access to everything. Even AWS recommends avoiding it. Instead, the recommended approach is to create a separate IAM user with the permissions you actually need, and use that day to day.
Let's set that up.
Step 1: Sign In as Root (One Last Time)
Go to console.aws.amazon.com. At this point, since we haven't created an IAM user yet, the only way to log in is with your root user email. Click Sign in using root user email, enter your root email and password, and complete the MFA step using your authenticator app (since we enabled MFA on the root user earlier).
This will be one of the last times you need to sign in as root — from here on, we're creating a proper IAM user to use instead.
Step 2: Navigate to IAM
Once you're in the AWS Management Console, open the main menu and go to All Services → Security, Identity, and Compliance → IAM.
One important note: don't confuse this with IAM Identity Center — that's a different service, for a different purpose. We specifically want plain IAM.
From the IAM service, you can create users, groups, and roles, and manage access.
Step 3: Create a New User
Go to IAM Users, and click Create user.
- Give the user a name (for example, your own name).
- Check Provide user access to the AWS Management Console — since this user will log in and use the console directly.
- You can either use an auto-generated password, or set a custom one. If you set a custom password, you'll also see an option "User must create a new password at next sign-in" — this is generally recommended, but for simplicity you can uncheck it if you don't want to be forced to change the password on first login.
Click Next to move on to permissions.
Step 4: Understand the Permission Model — Groups, Not Direct Assignment
Here's an important concept in AWS: you cannot assign permissions directly to a user. Instead, a user must belong to a group, and permissions are attached to that group. The user then inherits permissions through group membership.
Since we don't have any group yet, let's create one.
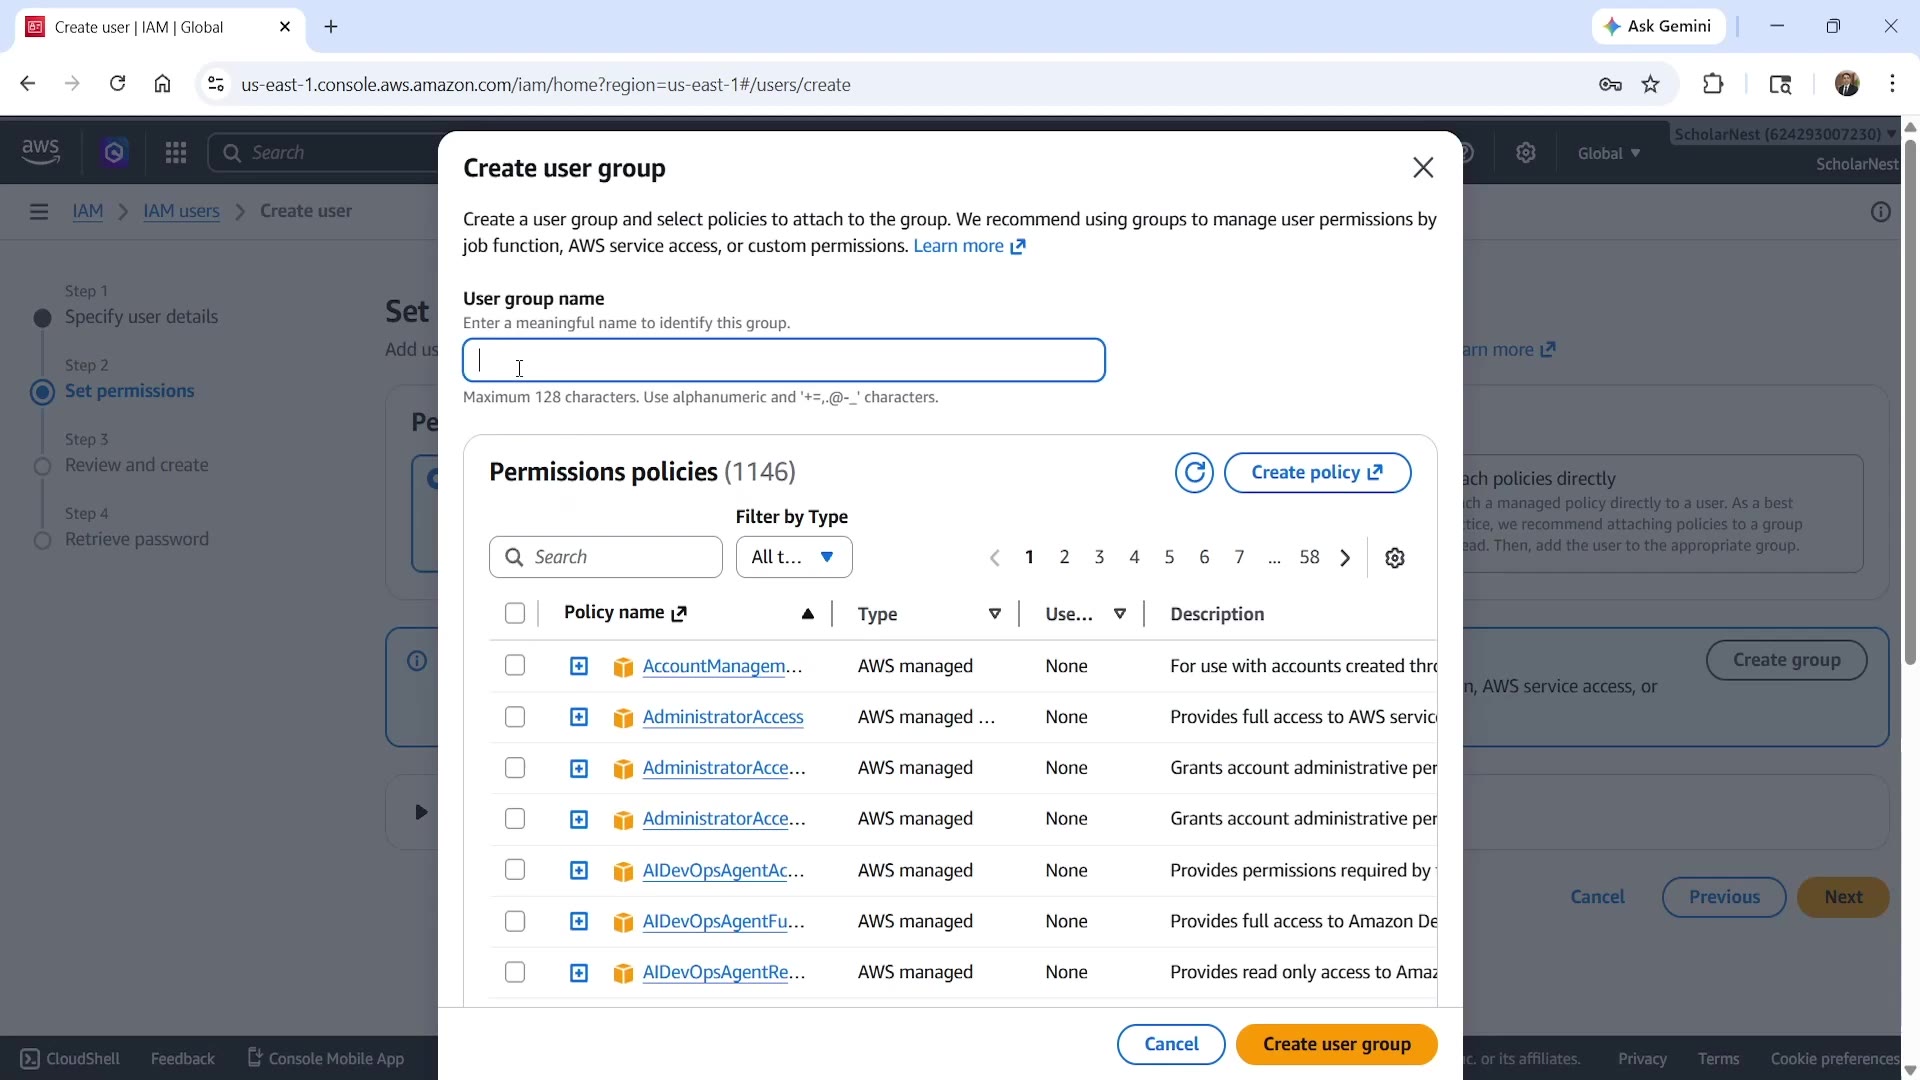 Create user group with permissions
- Click Create group.
- Give it a name — for example, Admin.
- Choose the permissions policy to attach. Since we want this user to be able to do essentially anything in AWS (create services, manage resources, etc.), we'll attach the AdministratorAccess policy.
- Click Create user group.
Once the group is created, you'll see it listed, with AdministratorAccess shown as its attached policy:
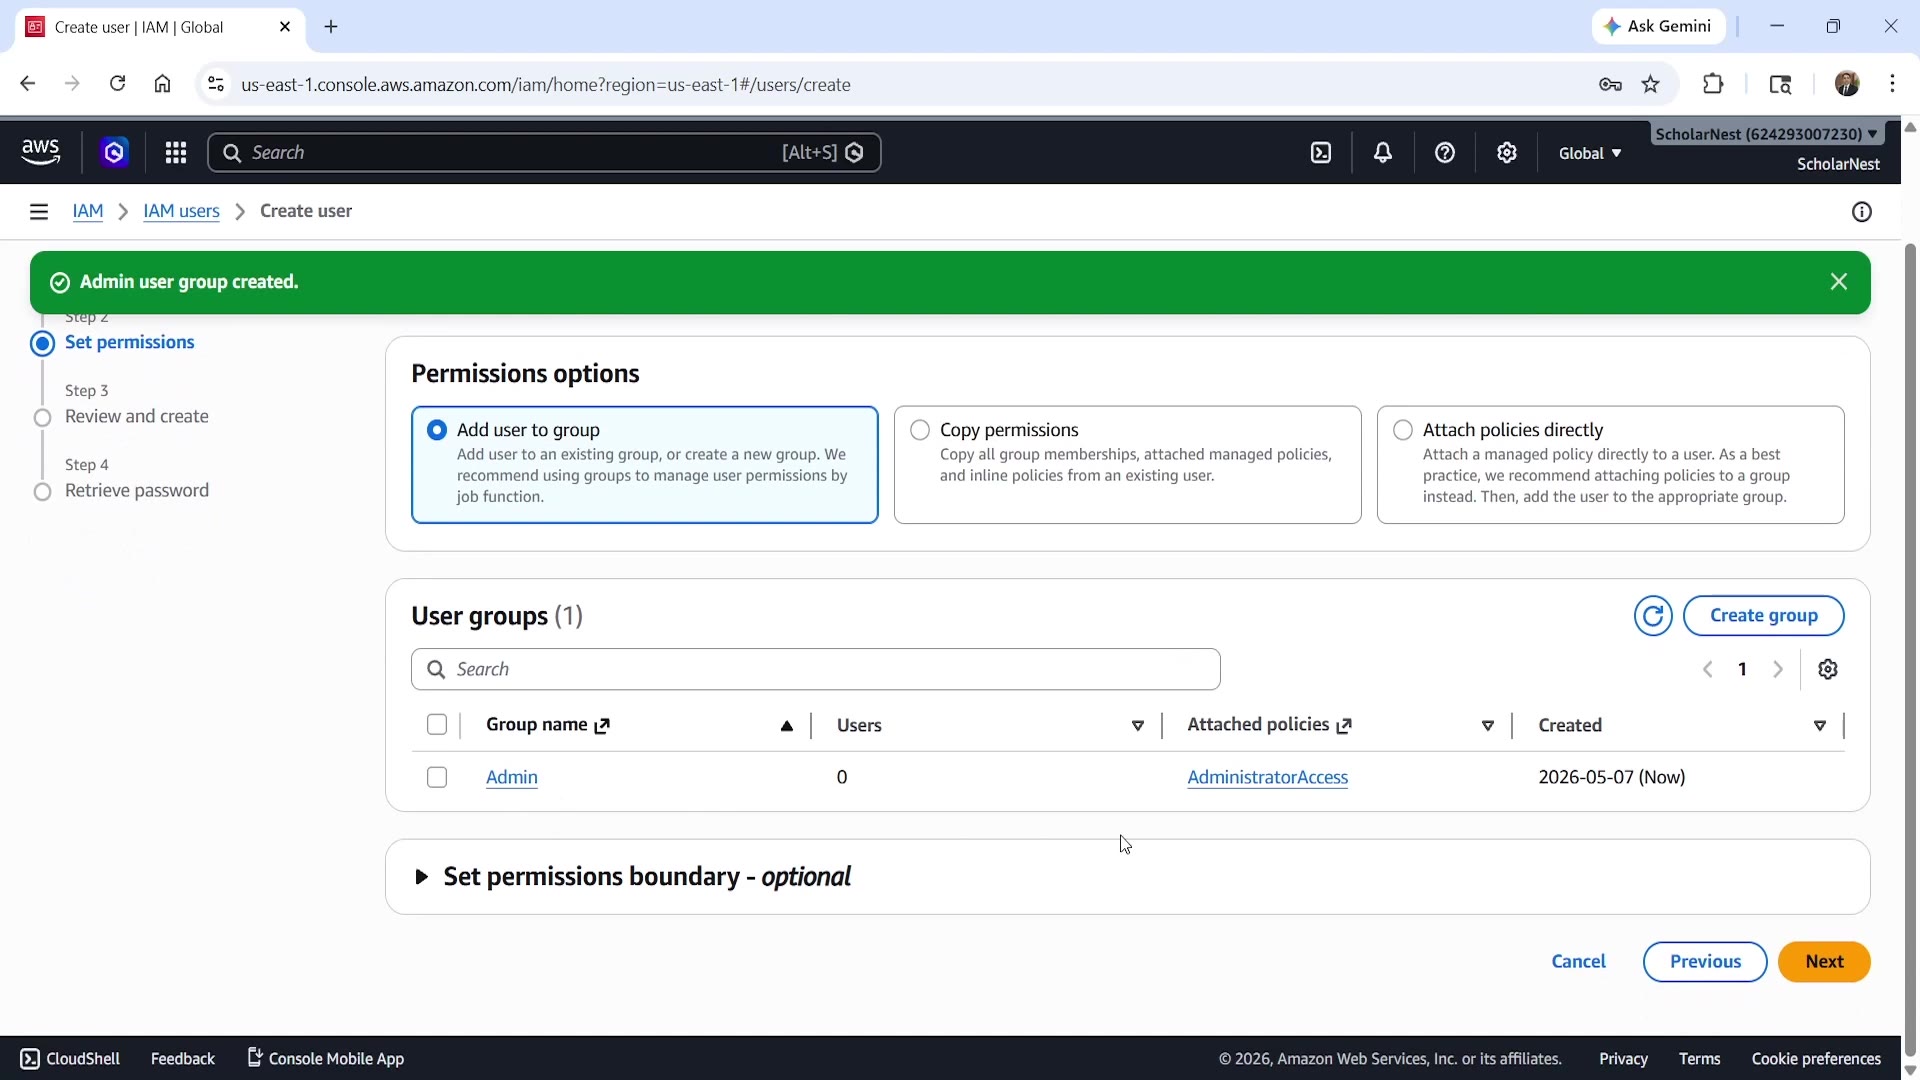 Add user to group during creation
Make sure the option Add user to group is selected, and that your new group appears in the list. This ensures the user we're creating gets added to this group (and inherits its permissions) right away.
Step 5: Review and Create
Move to Review and create. You'll see a summary — user name, console password setting, and the group it's being added to. Everything optional can be left as-is. Click Create user.
Step 6: Save the User's Credentials
Once the user is created, AWS shows you:
- The username
- The console password you set (you can reveal or copy it — worth saving securely)
- The console sign-in URL for this specific user
Copying this sign-in URL isn't mandatory, but it makes life easier for this user when logging in later — more on that in a moment.
A Few More Things You Can Do (Optional)
From the Users list, if you click into a user, you can:
- Enable MFA for that user too (recommended, same as we did for root).
- Go to Groups and manually add the user to a group (useful if you didn't do it during creation).
- Change the user's password, generate access keys/API keys, and view their last console access details.
If we hadn't added the user to the Admin group during creation, we'd need to do it here manually — group membership is what actually grants the permissions.
Step 7: Set Up an Account Alias (Optional but Useful)
Go back to the IAM dashboard. You'll see your Account ID — and this account ID is part of the sign-in URL that IAM users use to log in (something like account-id.signin.aws.amazon.com/console).
Typing a long numeric account ID every time is inconvenient, so AWS lets you create an alias for it instead — a friendly name you can use in place of the account ID.
Create an alias (for example, your organization's name), and once it's set, your IAM sign-in URL updates to use that alias instead of the raw account ID. Copy this URL and save it — this is what you (and any IAM users you create) will use to log in going forward.
Step 8: Sign In as the IAM User
Sign out of the root session, and go back to the AWS sign-in page. You have two ways to sign in as an IAM user:
- Manually enter the Account ID or alias, your IAM username, and password.
- Or, simply paste the sign-in URL you copied earlier — this pre-fills the account ID/alias for you.
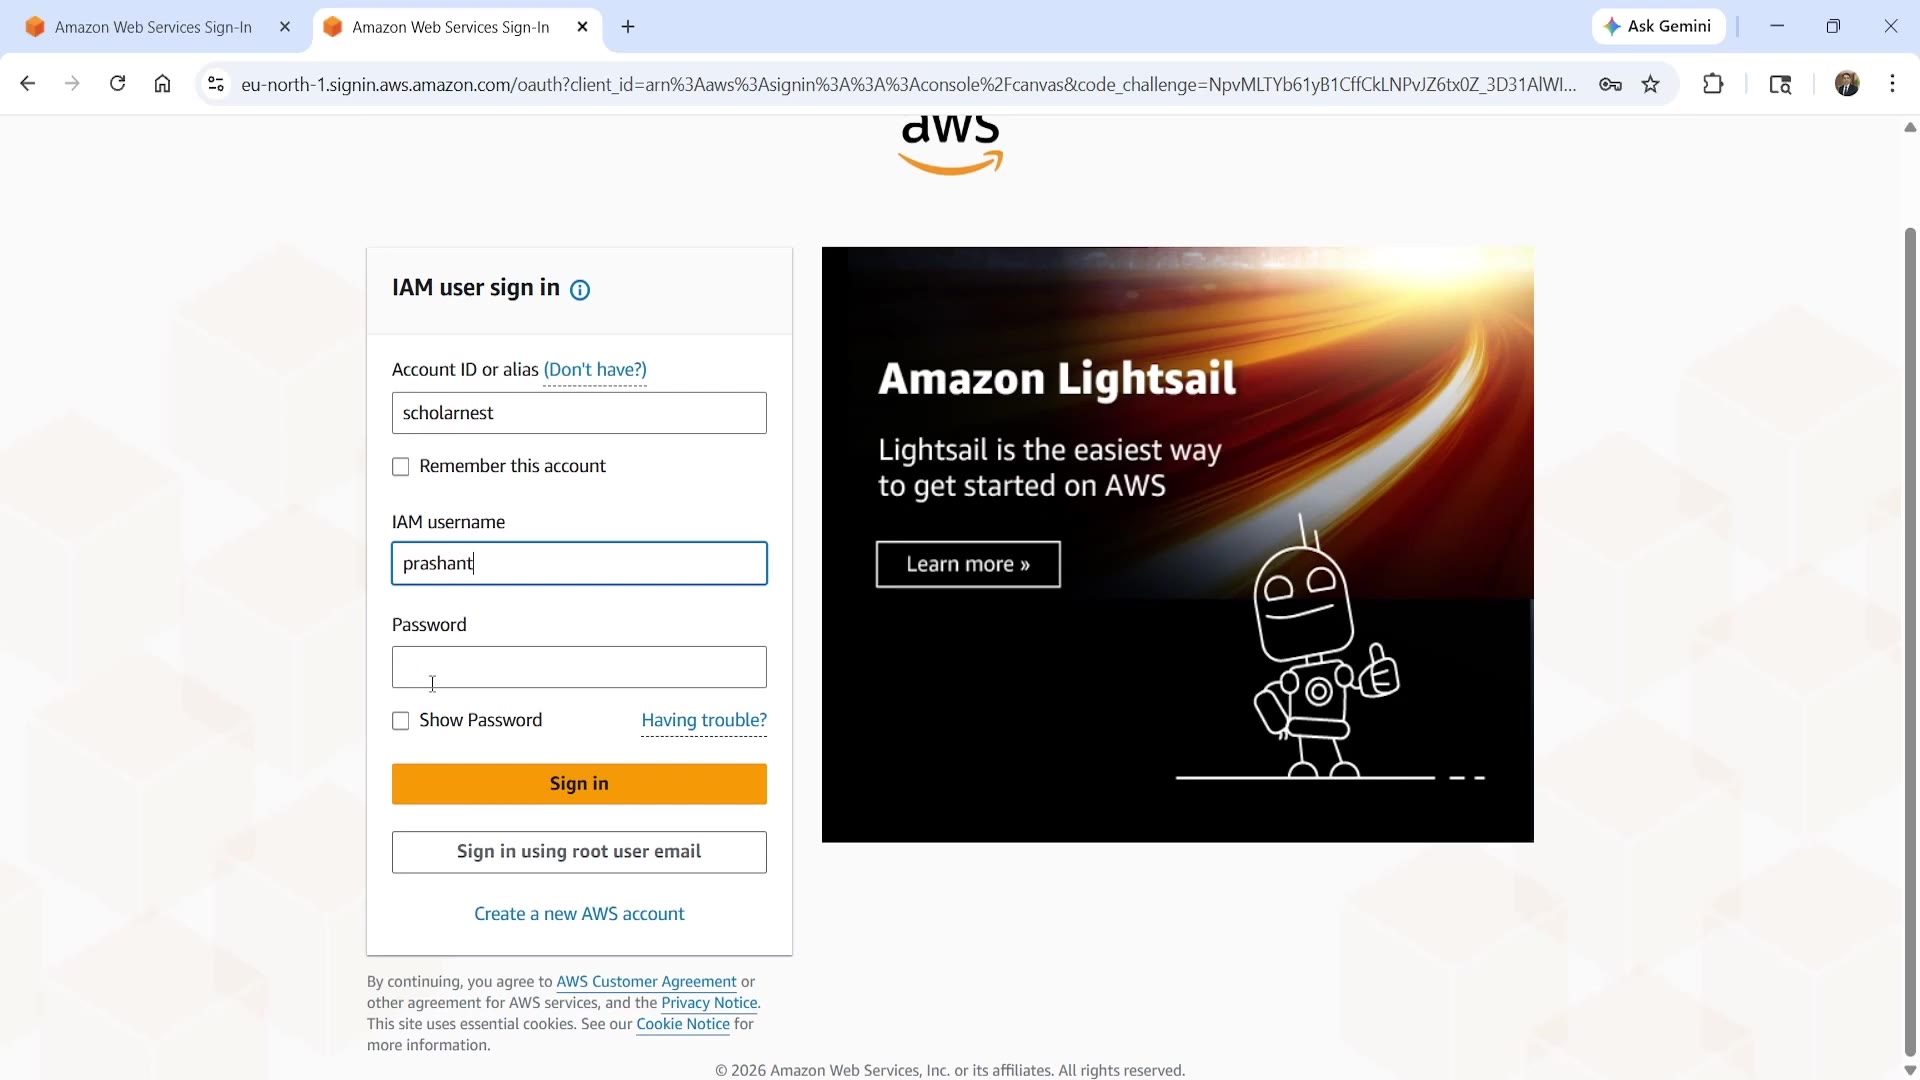 IAM user sign-in with account alias
Enter your IAM username and password, and sign in.
Step 9: Set Your Region Again
Here's an important detail: the region you set earlier was only for the root user session. Since we're now working as the IAM user, you need to set the region again for this login too.
As before, we recommend North Virginia (us-east-1) or Ohio (us-east-2). Once set, anything you create in AWS going forward will be created in that region.
Summary
| Step | What You Do |
|---|---|
| 1 | Sign in as root (one last time) |
| 2 | Navigate to IAM (not IAM Identity Center) |
| 3 | Create a new user, enable console access |
| 4 | Create a group (e.g., "Admin"), attach AdministratorAccess policy |
| 5–6 | Review, create, and save the user's credentials and sign-in URL |
| 7 | Create an account alias to simplify the sign-in URL |
| 8 | Sign in as the IAM user |
| 9 | Set your region again (region settings are per-login) |
That's it — we now have an IAM user with administrator access, ready to use for the rest of this course. Going forward, we'll be using this IAM user — not the root account — to create services and build everything we learn about Databricks data engineering.
See you again. Keep learning, and keep growing!