The Producer API & Your First Producer
The Requirement
You are the data engineer for an e-commerce platform.
Every time a user does something on the site, an event must reach Kafka immediately. A user might view a product, search, add something to the cart, or complete a purchase.
Three systems depend on these events:
- A recommendation engine that reacts to behavior in real time.
- A fraud-detection pipeline that watches for suspicious patterns.
- An analytics warehouse that powers every business dashboard.
This happens for thousands of users at the same time, all day. Nobody sits at a screen typing these events by hand. A user clicks, and the event must go out on its own.
Why This Can't Be a CLI Job
How have you sent messages to Kafka so far?
With kafka-console-producer.sh. It is a good tool. But look at what it needs.
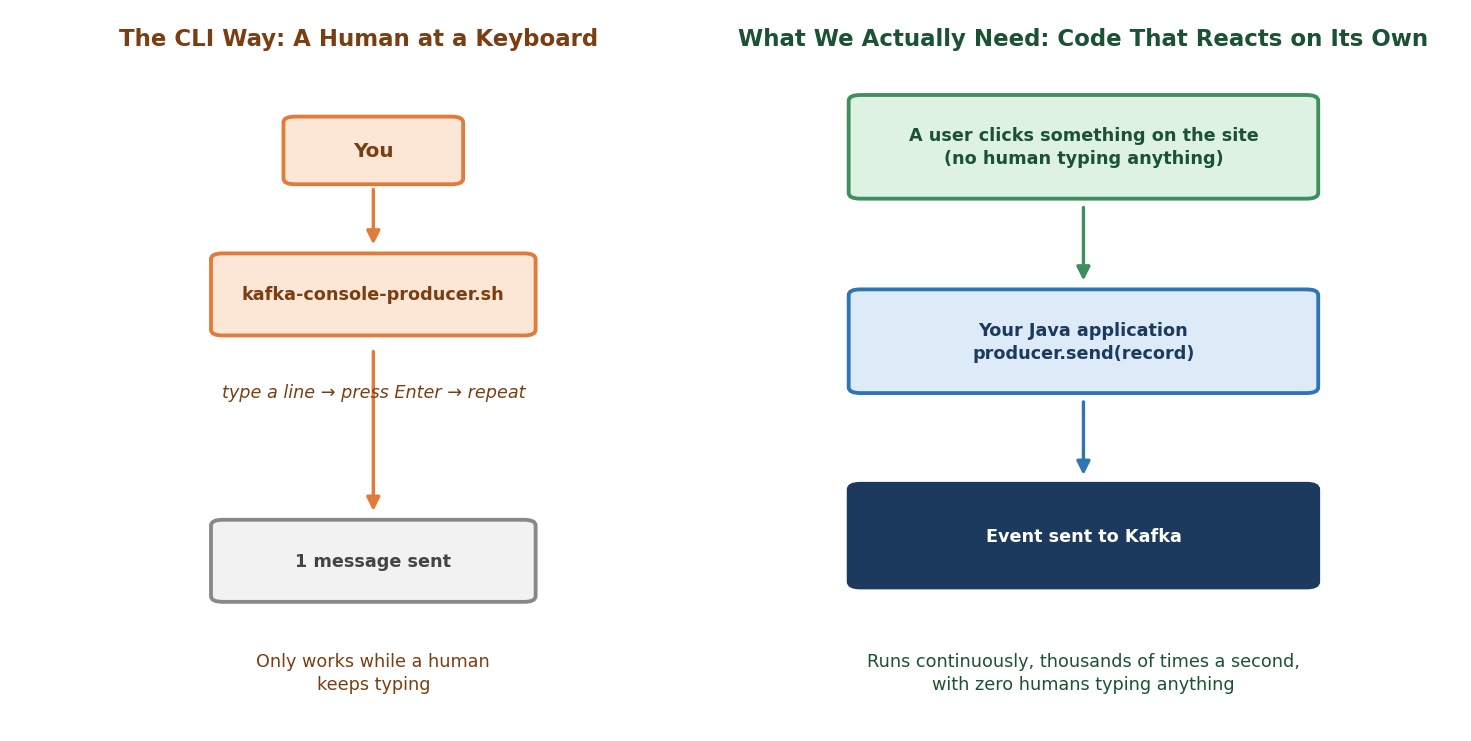 CLI vs. an application producing events on its own
Who types the messages?
A human. The console producer reads lines that a person types. It can also read from a file. But our events do not come from a file. They come from a user clicking, inside a running application, thousands of times a second.
So we need code that sends messages to Kafka from inside our own application, the moment something happens. That is what a client library gives you. You add it to your program, and your code can talk to Kafka the way the CLI tool does, but with no human in the middle.
Our language is Java. Our library is the official Kafka Java client, a single library called kafka-clients. It contains the producer, the consumer and the admin client. In this chapter we use the producer.
This is also the first time in this course that we write code. So we have two jobs today:
- Part A: Set up IntelliJ IDEA and a Maven project, and check that our code can reach the cluster.
- Part B: Write our first producer.
Part A: Setting Up Your Project in IntelliJ IDEA
We create the project once. Every lecture after this adds a few classes to the same project.
What You Need
You already installed these in the setup lecture. Check them once, in a terminal:
powershelljava --version mvn -version docker ps
java --versionshould show a JDK. In this course we run on JDK 25, and JDK 21 or newer also works.mvn -versionshould show Apache Maven.docker psshould list your three brokers. If it is empty, start them from yoursetupfolder withdocker compose start.
What is Maven, and why do we need it?
Our program needs other people's code: the Kafka client, a JSON library, a logging library. We do not want to download jar files by hand. Maven does it for us. We list what we need in one file, called pom.xml. Maven downloads those libraries, and the libraries they need, and gives them to our project. Maven also builds the project. IntelliJ has Maven built in, so we do not have to run anything ourselves.
Step 1: Create the Project
- Start IntelliJ IDEA. On the welcome screen, click New Project. (If a project is already open, use File → New → Project.)
- Fill in the form:
| Field | Value |
|---|---|
| Name | kafka-java-course |
| Location | Your Kafka course folder, next to setup |
| Language | Java |
| Build system | Maven |
| JDK | Your JDK 25 (or 21+). Pick it from the list. |
| Add sample code | Untick it |
- Open Advanced Settings, and set:
| Field | Value |
|---|---|
| GroupId | com.kafkacourse |
| ArtifactId | kafka-java-course |
- Click Create.
(The wording of the form changes a little between IntelliJ versions. The values above are what matter.)
The JDK list is empty. What now?
Click the list and choose Add JDK from disk…. Select the folder where you installed the JDK. Or choose Download JDK…, and pick version 25 and vendor Temurin.
Step 2: Look Around
IntelliJ opens the project. Take a minute to find these five places.
| Where | What it is |
|---|---|
Project window (left side, Alt+1) | Your files and folders |
src/main/java | Where all our Java code goes |
src/main/resources | Where non-code files go, such as settings |
pom.xml | The Maven file. It lists the libraries we need. |
| Maven window (right side) | Shows dependencies, and has a button to reload them |
At the bottom you will use two more windows: the Run window, which shows the output of your program, and the Terminal (Alt+F12), which is a normal terminal inside IntelliJ.
Step 3: Add the Libraries
Open pom.xml. Select everything in it, and replace it with this:
xml<?xml version="1.0" encoding="UTF-8"?> <project xmlns="http://maven.apache.org/POM/4.0.0" xmlns:xsi="http://www.w3.org/2001/XMLSchema-instance" xsi:schemaLocation="http://maven.apache.org/POM/4.0.0 http://maven.apache.org/xsd/maven-4.0.0.xsd"> <modelVersion>4.0.0</modelVersion> <groupId>com.kafkacourse</groupId> <artifactId>kafka-java-course</artifactId> <version>1.0-SNAPSHOT</version> <packaging>jar</packaging> <properties> <!-- Language level. Any JDK from 21 upward can build this project. --> <maven.compiler.release>21</maven.compiler.release> <project.build.sourceEncoding>UTF-8</project.build.sourceEncoding> <kafka.version>4.3.1</kafka.version> <jackson.version>2.21.2</jackson.version> <slf4j.version>2.0.17</slf4j.version> </properties> <dependencies> <!-- The Kafka client library: producer, consumer and admin APIs --> <dependency> <groupId>org.apache.kafka</groupId> <artifactId>kafka-clients</artifactId> <version>${kafka.version}</version> </dependency> <!-- Turns our Java objects into JSON (and back) --> <dependency> <groupId>com.fasterxml.jackson.core</groupId> <artifactId>jackson-databind</artifactId> <version>${jackson.version}</version> </dependency> <!-- Prints the client's log messages to the console --> <dependency> <groupId>org.slf4j</groupId> <artifactId>slf4j-simple</artifactId> <version>${slf4j.version}</version> </dependency> </dependencies> <build> <plugins> <plugin> <groupId>org.apache.maven.plugins</groupId> <artifactId>maven-compiler-plugin</artifactId> <version>3.14.0</version> </plugin> </plugins> </build> </project>
Let's read the important parts.
kafka-clients4.3.1. The Kafka client library. We use the same version as our brokers.jackson-databind. Our events will be Java objects. Kafka stores bytes. Jackson turns an object into JSON text.slf4j-simple. The Kafka client writes log messages. This library prints them to the console.maven.compiler.release21. This sets the Java language level. It is fine that your JDK is 25 and the level is 21. Everything in this course works on both.
Now tell IntelliJ that the file changed. A small button with an m appears at the top right of the editor: Load Maven Changes. Click it. (You can also open the Maven window and click Reload All Maven Projects, the circular-arrows icon.)
The first time, IntelliJ downloads the libraries. Watch the progress bar at the bottom right. It takes a minute.
How do I know it worked?
In the Project window, scroll to the bottom and open External Libraries. You should see kafka-clients-4.3.1, jackson-databind, and slf4j-simple.
Remember this step. Every time you change pom.xml, click Load Maven Changes again.
Step 4: Add the Logging Settings
Kafka's client logs a lot. We keep the console readable with a small settings file.
Right-click src/main/resources → New → File. Name it simplelogger.properties. Paste:
properties# Console logging for the Kafka client (slf4j-simple). # WARN keeps the console readable. Change "org.apache.kafka" to "info" to see # the full list of client settings, including every default value. org.slf4j.simpleLogger.defaultLogLevel=warn org.slf4j.simpleLogger.log.org.apache.kafka=warn org.slf4j.simpleLogger.showDateTime=true org.slf4j.simpleLogger.dateTimeFormat=HH:mm:ss.SSS org.slf4j.simpleLogger.showThreadName=true
(If there is no resources folder under src/main, right-click main → New → Directory → resources.)
Step 5: Your First Class — Can We Reach the Cluster?
Before we write a producer, let's check one thing. Can a Java program on your machine reach Kafka running in Docker? We answer that with a tiny class.
Make sure your cluster is running (docker ps). Then:
- Right-click
src/main/java→ New → Package. Typecom.kafkacourse.setup. - Right-click that package → New → Java Class. Name it
ClusterCheck. - Replace everything in the file with this:
javapackage com.kafkacourse.setup; import org.apache.kafka.clients.admin.Admin; import org.apache.kafka.clients.admin.AdminClientConfig; import org.apache.kafka.clients.admin.DescribeClusterResult; import org.apache.kafka.common.Node; import java.util.Properties; import java.util.concurrent.TimeUnit; import java.util.concurrent.TimeoutException; /** * Setup check: can our Java program, running on our own machine, * reach the Kafka cluster running in Docker? */ public class ClusterCheck { private static final String BOOTSTRAP_SERVERS = "localhost:9092,localhost:9094,localhost:9095"; public static void main(String[] args) throws Exception { Properties config = new Properties(); config.put(AdminClientConfig.BOOTSTRAP_SERVERS_CONFIG, BOOTSTRAP_SERVERS); try (Admin admin = Admin.create(config)) { DescribeClusterResult cluster = admin.describeCluster(); try { System.out.println("Cluster id: " + cluster.clusterId().get(15, TimeUnit.SECONDS)); for (Node broker : cluster.nodes().get(15, TimeUnit.SECONDS)) { System.out.printf("Broker %d is at %s:%d%n", broker.id(), broker.host(), broker.port()); } } catch (TimeoutException e) { System.out.println("No answer from the cluster within 15 seconds."); System.out.println("Is Docker running? Try: docker compose start"); } } } }
The package line at the top must match the package you created. IntelliJ writes it for you, so keep it.
You do not need to understand this class yet. It uses the Admin client, the part of kafka-clients that asks the cluster questions. It asks: "Who are you?"
Run It
Look at the green triangle in the left margin, next to public static void main. Click it, and choose Run 'ClusterCheck.main()'.
The Run window opens at the bottom. You should see a cluster id and one line for each broker, three in total:
Cluster id: ...
Broker 1 is at localhost:9092
Broker 2 is at localhost:9094
Broker 3 is at localhost:9095
(Your cluster id, and the broker numbers, may differ. What matters is three brokers with the ports you set up.)
Two useful keys: Shift+F10 runs the last configuration again, and the red square in the Run window stops a running program.
If Something Goes Wrong
| What you see | What it means | What to do |
|---|---|---|
Cannot resolve symbol 'Admin' (red text in the code) | Maven has not loaded the libraries | Click Load Maven Changes. Then check External Libraries. |
No answer from the cluster within 15 seconds | The program cannot reach the brokers | Run docker ps. If empty, run docker compose start in your setup folder. |
Warnings like Connection to node -1 could not be established | Same as above | Same as above |
invalid target release or release version not supported | IntelliJ uses a JDK older than 21 | File → Project Structure → Project, set SDK to your JDK 21 or newer. |
| Nothing downloads, and Maven shows errors | No internet, or a company proxy blocks Maven | Check your connection. Ask your IT team for the proxy settings. |
| A warning about SLF4J at startup | The slf4j-simple library is missing, or its version doesn't match kafka-clients' own SLF4J version | Check pom.xml and reload Maven. If the warning mentions "no providers were found," your slf4j-simple version is too old for the slf4j-api that kafka-clients pulls in — keep slf4j.version on the 2.x line shown above. |
When you see three brokers, your setup is complete. Everything from now on is Kafka.
Part B: Your First Producer
The Plan: Six Steps
Creating a producer in your application is a six-step process. Here is the big picture first.
- Connect to the cluster. Give the producer the connection details and settings.
- Create the producer. Make an instance of the
KafkaProducerclass with those settings. - Define the message. A message has a key and a value. Both must be turned into bytes (this is called serialization).
- Send the message. Hand it to the producer.
- Know when it arrived. Kafka answers with an acknowledgment. We receive it through a callback.
- Flush. Before the program ends, wait until nothing is left behind.
We will do this in two rounds. First, we write the code and make it work. Then we open the box and look at what happened inside.
Let's Build It
Here is what we are building:
Output / NoteA class that simulates an
EventTrackingService. Every time a user interacts with the site, it publishes an event to a topic calledclickstream-events, using the user ID as the key.
We need three small classes. Two are helpers, in a package called common. The third is the producer.
The Event: ClickEvent
Right-click src/main/java → New → Package → com.kafkacourse.common. Then right-click the package → New → Java Class, choose Record, and name it ClickEvent.
javapackage com.kafkacourse.common; import com.fasterxml.jackson.annotation.JsonProperty; /** * One click on the website. A Java record is a short way to write a class * that only holds data. Jackson turns it into JSON like this: * {"user_id":"user-501","event_type":"search","event_time":1.7e9} */ public record ClickEvent( @JsonProperty("user_id") String userId, @JsonProperty("event_type") String eventType, @JsonProperty("event_time") double eventTime) { }
What is a record?
A short way to write a class that only holds data. The three values in brackets become fields, and Java creates the constructor and the getters for you. The @JsonProperty lines only say which name each field gets in the JSON.
The Serializer: JsonSerializer
In the same package, create a Java Class named JsonSerializer.
javapackage com.kafkacourse.common; import com.fasterxml.jackson.core.JsonProcessingException; import com.fasterxml.jackson.databind.ObjectMapper; import org.apache.kafka.common.errors.SerializationException; import org.apache.kafka.common.serialization.Serializer; /** * Turns any Java object into JSON bytes. Kafka calls serialize() for us, * inside producer.send(), so the producer only ever handles bytes. */ public class JsonSerializer<T> implements Serializer<T> { private final ObjectMapper mapper = new ObjectMapper(); @Override public byte[] serialize(String topic, T data) { if (data == null) { return null; } try { return mapper.writeValueAsBytes(data); } catch (JsonProcessingException e) { throw new SerializationException("Could not turn the object into JSON: " + data, e); } } }
We come back to why this class exists in Step 3. Now the producer itself.
The Producer: ClickstreamProducer
Create the package com.kafkacourse.ch04, and in it a Java Class named ClickstreamProducer. We build it step by step. The complete file is at the end of this section.
Step 1: Connect to the Cluster
javaprivate static final String BOOTSTRAP_SERVERS = "localhost:9092,localhost:9094,localhost:9095"; private static final String TOPIC = "clickstream-events"; Properties config = new Properties(); config.put(ProducerConfig.BOOTSTRAP_SERVERS_CONFIG, BOOTSTRAP_SERVERS); config.put(ProducerConfig.CLIENT_ID_CONFIG, "event-tracking-service-demo"); config.put(ProducerConfig.KEY_SERIALIZER_CLASS_CONFIG, StringSerializer.class.getName()); config.put(ProducerConfig.VALUE_SERIALIZER_CLASS_CONFIG, JsonSerializer.class.getName());
The settings live in a Properties object, which is a list of name and value pairs. ProducerConfig holds the names as constants, so IntelliJ can complete them, and we never mistype one. For example, ProducerConfig.BOOTSTRAP_SERVERS_CONFIG is the text bootstrap.servers.
Four settings need a closer look.
What is bootstrap.servers?
It tells the producer where the cluster is. But it is not "the list of every broker you must connect to". It is a list of starting points. The producer contacts one of them and asks the cluster: "Who are you, and which broker leads which partition?" After that, it knows the whole cluster and talks to the right broker for each message. That is why it is called bootstrap.
Then why list three brokers?
Safety. If one broker is down at the exact moment your producer starts, the producer can still use another one. Three is a good number, even if your cluster has 50 brokers. You do not need to list them all.
Why localhost and not kafka-1:29092?
The commands you ran in the broker shell ran inside Docker. Your Java program runs on your own machine, outside Docker. So it must use the external ports your docker-compose.yml publishes: 9092, 9094 and 9095. This is the same thing ClusterCheck just proved.
What is client.id?
A name your producer gives itself. It has little effect on how things work. But it is sent to the broker, so in broker logs and metrics you can tell which application sent what. We will also see it in a thread name in a few minutes.
What are the two serializer settings?
Kafka stores bytes. It does not store Java objects or strings. So the producer needs to know how to turn our key and our value into bytes. We give it two classes:
StringSerializerfor the key. It comes with Kafka. It turns a string into bytes.JsonSerializerfor the value. It is the class we wrote. It turns ourClickEventinto JSON bytes.
The producer requires both settings. Without them, it refuses to start.
Step 2: Create the Producer
javatry (KafkaProducer<String, ClickEvent> producer = new KafkaProducer<>(config)) { // ... everything else goes here ... }
This is the moment your program becomes a Kafka client. You create it once and reuse it for every message. Remember this line. When we look inside the producer, you will see that it does more work than it looks like.
What are <String, ClickEvent>?
They are the types of the key and the value. The producer accepts only a String key and a ClickEvent value. If you try to send anything else, the compiler stops you before you even run the program.
What is try ( ... ) { ... }?
It is called try-with-resources. When the block ends, Java automatically calls producer.close(). This matters: close() waits for all messages that are still on their way, and then shuts the producer down. So even if we forget to flush, no message is left behind.
Step 3: Define the Message
Every message can carry a key and a value. Let's decide what ours will be.
The value is the payload: the click event itself.
javaprivate static final List<String> EVENT_TYPES = List.of("page_view", "search", "add_to_cart", "purchase_completed"); private static ClickEvent makeClickEvent(String userId) { String eventType = EVENT_TYPES.get(RANDOM.nextInt(EVENT_TYPES.size())); return new ClickEvent(userId, eventType, System.currentTimeMillis() / 1000.0); }
This method is a mock event generator. It stands in for your real website.
Is a key required?
No. A key is optional. Kafka accepts messages without one. But a key is very useful, and we choose to use one here. Also, a key is not a unique ID like a primary key in a database. Many messages can share the same key.
Why do we use a key at all?
Because the key decides which partition a message goes to. Think about what our pipeline needs. Suppose you want to rebuild a user's session: the exact order of pages they saw before buying something. Those events must stay in order. Kafka guarantees order only inside one partition. So all events of the same user must go to the same partition. The key that gives us this is the user ID.
We wrap key and value in a ProducerRecord. This is the message, as Kafka sees it:
javaProducerRecord<String, ClickEvent> record = new ProducerRecord<>(TOPIC, userId, event);
The three arguments are: the topic, the key, and the value.
Where is the serialization?
Notice that we hand over a String and a ClickEvent. No bytes. The producer calls our serializers for us, inside send(). In Java, the serializer is a setting of the producer, not code that we call ourselves. That is why we wrote JsonSerializer once, and never think about it again.
Step 4: Send the Message
javaproducer.send(record, (metadata, exception) -> deliveryReport(userId, metadata, exception));
The method is called send(). It returns almost at once. It does not wait for Kafka to confirm the message. It only puts the message into the producer's buffer, and the sending happens in the background. We will see exactly how in a few minutes.
Step 5: Know When a Message Arrived
After send() returns, how do we find out whether the message really reached Kafka?
The second argument of send() is a callback: a piece of code we hand over, to be called later. Once Kafka has answered, the producer calls it with two values:
metadata: the topic, partition and offset where the message was stored. It is filled in on success.exception:nullon success, or the error on failure.
So in both cases (success or failure) you get an answer.
javaprivate static void deliveryReport(String userId, RecordMetadata metadata, Exception exception) { if (exception != null) { System.out.println("Delivery failed for key=" + userId + ": " + exception); } else { System.out.printf("Delivered to %s [partition %d] offset %d key=%s (thread: %s)%n", metadata.topic(), metadata.partition(), metadata.offset(), userId, Thread.currentThread().getName()); } }
(metadata, exception) -> deliveryReport(...) is a lambda: a short way to write a small function. We use it so the callback can also see userId, because metadata does not carry the key.
The last part of the printout shows which thread runs the callback. Keep an eye on that. It will be a surprise.
Do we have to call anything to make the callback run?
No. In Java, the producer runs your callback by itself, on one of its own background threads. You do not poll for it.
Step 6: Flush
javaSystem.out.println("Flushing after all messages sent..."); producer.flush();
Messages are sent in the background. So your program could reach its last line and exit while some messages are still on their way. flush() waits until every message is confirmed (or failed), and calls all remaining callbacks.
But close() already waits. Why also flush()?
close() at the end of the try block waits for everything too. So in this program, flush() is not strictly needed. We still write it, on purpose, for two reasons. It makes the step visible. And in real applications, you often want to flush without closing: for example, at the end of a batch, while the producer keeps living.
The Complete Class
Here is the whole file. Replace the content of ClickstreamProducer with it.
javapackage com.kafkacourse.ch04; import com.kafkacourse.common.ClickEvent; import com.kafkacourse.common.JsonSerializer; import org.apache.kafka.clients.producer.KafkaProducer; import org.apache.kafka.clients.producer.ProducerConfig; import org.apache.kafka.clients.producer.ProducerRecord; import org.apache.kafka.clients.producer.RecordMetadata; import org.apache.kafka.common.serialization.StringSerializer; import java.util.List; import java.util.Properties; import java.util.Random; /** * Simulates an EventTrackingService: every user click becomes an event * in the topic "clickstream-events", with the user ID as the key. */ public class ClickstreamProducer { // Step 1: Connect to the Kafka cluster - bootstrap servers, client id, serializers private static final String BOOTSTRAP_SERVERS = "localhost:9092,localhost:9094,localhost:9095"; private static final String TOPIC = "clickstream-events"; private static final List<String> EVENT_TYPES = List.of("page_view", "search", "add_to_cart", "purchase_completed"); private static final List<String> USER_IDS = List.of("user-501", "user-502", "user-503", "user-504", "user-505", "user-506", "user-507"); private static final Random RANDOM = new Random(); public static void main(String[] args) { Properties config = new Properties(); config.put(ProducerConfig.BOOTSTRAP_SERVERS_CONFIG, BOOTSTRAP_SERVERS); config.put(ProducerConfig.CLIENT_ID_CONFIG, "event-tracking-service-demo"); config.put(ProducerConfig.KEY_SERIALIZER_CLASS_CONFIG, StringSerializer.class.getName()); config.put(ProducerConfig.VALUE_SERIALIZER_CLASS_CONFIG, JsonSerializer.class.getName()); // Step 2: Create the producer (try-with-resources closes it for us at the end) try (KafkaProducer<String, ClickEvent> producer = new KafkaProducer<>(config)) { for (int i = 0; i < 20; i++) { String userId = USER_IDS.get(RANDOM.nextInt(USER_IDS.size())); // Step 3: Define the message - a key and a value ClickEvent event = makeClickEvent(userId); ProducerRecord<String, ClickEvent> record = new ProducerRecord<>(TOPIC, userId, event); // Step 4 + 5: Send the message, and say what to do when the answer comes back producer.send(record, (metadata, exception) -> deliveryReport(userId, metadata, exception)); System.out.println("Queued " + userId + " : " + event); } // Step 6: Make sure nothing is left behind System.out.println("Flushing after all messages sent..."); producer.flush(); } } private static ClickEvent makeClickEvent(String userId) { String eventType = EVENT_TYPES.get(RANDOM.nextInt(EVENT_TYPES.size())); return new ClickEvent(userId, eventType, System.currentTimeMillis() / 1000.0); } /** Called once for every message, to report success or failure. */ private static void deliveryReport(String userId, RecordMetadata metadata, Exception exception) { if (exception != null) { System.out.println("Delivery failed for key=" + userId + ": " + exception); } else { System.out.printf("Delivered to %s [partition %d] offset %d key=%s (thread: %s)%n", metadata.topic(), metadata.partition(), metadata.offset(), userId, Thread.currentThread().getName()); } } }
The loop makes 20 events for seven users. After each send(), it prints a Queued line. We added that line on purpose, to help us look inside the producer later.
Running It
Step 1: Start Your Cluster
You probably still have it running from ClusterCheck. If not, open a terminal in the setup folder (where your docker-compose.yml is):
powershelldocker compose start docker ps
Step 2: Create the Topic
Does the topic have to exist first?
You should create it yourself. (Depending on broker settings, Kafka may create a missing topic automatically, but with default settings such as a single partition. That is not what we want.)
powershelldocker exec -it kafka-1 bash
You are now inside the broker container. These commands run there:
bashexport PATH=$PATH:/opt/kafka/bin
bashkafka-topics.sh --create \ --topic clickstream-events \ --bootstrap-server kafka-1:29092 \ --partitions 3 \ --replication-factor 3
Then leave the broker shell with exit.
Step 3: Run the Producer
Open ClickstreamProducer. Click the green triangle next to main, and choose Run 'ClickstreamProducer.main()'.
What do you see?
You will see 20 Queued ... lines, one for each event. You will see Flushing after all messages sent.... And you will see 20 lines that start with Delivered to clickstream-events [partition ...] offset ....
Look carefully at the order. The Delivered lines do not arrive one by one right after each Queued line. They come later, after most or all of the Queued lines. Also, look at the end of every Delivered line: it names a thread that is not the main thread. Hold on to that thought. We will explain both in the next section.
Also look at the partitions. Each user always lands on the same partition. And you may notice that some partition gets only a few messages, or none at all. With only seven users and 20 events, that is perfectly normal.
The program ends by itself. (If it seems to hang for a moment at the start, that is normal. The first send() has to fetch information from the cluster first. We explain this below.)
Step 4: Verify From the Consumer Side
Back in a terminal:
powershelldocker exec -it kafka-1 bash
bashexport PATH=$PATH:/opt/kafka/bin
bashkafka-console-consumer.sh \ --topic clickstream-events \ --bootstrap-server kafka-1:29092 \ --from-beginning \ --property print.key=true \ --property key.separator=" : "
You should see all 20 events, each with the user ID as the key and a JSON click event as the value. (If you run the producer again, you will see 40, then 60, and so on. Every run adds more.) Press Ctrl+C to stop the consumer, and exit to leave the broker shell.
Step 5: Stop Your Cluster
When you are done for the day, in the setup folder:
powershelldocker compose stop
Now — What Actually Happened Inside?
You have a working producer. But two things about its output were strange. Let's write them as questions.
Question 1. send() was called 20 times, and the Delivered lines came later. Also, they were printed by a thread with a strange name, not by main. Who ran our callback, and why so late?
Question 2. We never told the producer which partition to use. So who decided that some events go to partition 0, some to partition 1, and some to partition 2?
To answer both, let's follow one message all the way out to the broker, and the answer all the way back.
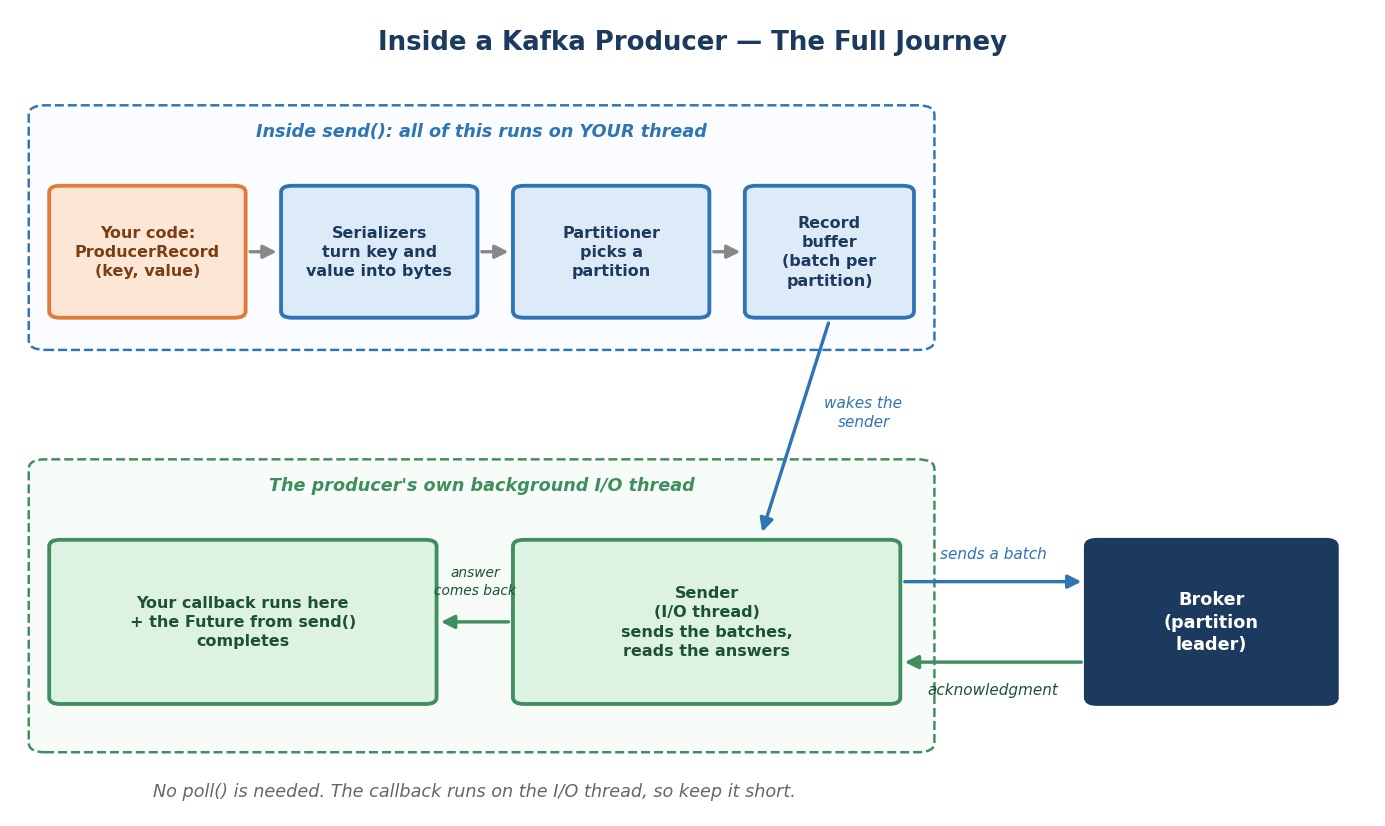 Inside a Kafka producer
The Outbound Half: Getting a Message to the Broker
Everything in the blue box happens inside send(), on your own thread (the main thread in our program).
Step 1. The producer finds out about the topic. Before it can place a message, it must know the topic's partitions and which broker leads each one. If it does not know yet, it asks the cluster and waits for the answer. This happens for the first send() to a topic. That is why the program seemed to pause for a moment at the start. (If the topic cannot be found, the wait is limited by a setting called max.block.ms, 60 seconds by default. After that, you get a TimeoutException.)
Step 2. The serializers run. The producer calls StringSerializer for the key and JsonSerializer for the value. From this point, key and value are just bytes.
Step 3. The partitioner picks the partition. The producer takes the key bytes, runs them through a hash function, and turns the result into a partition number. The Java client uses a hash called Murmur2. It knows how many partitions the topic has, so the number is always valid. Same key gives the same hash, and so the same partition, every time. That is the whole reason all events of user-501 always land together. Different keys can share a partition. But one key never moves.
partition = murmur2(key bytes) % number_of_partitions
(This is fast, in-memory work. In the next lecture, we open this decision up completely.)
Step 4. The message goes into an internal buffer. It does not go to the network yet. It waits in memory, in a queue for its partition. Messages for the same partition wait together, in a batch. Now send() is finished, and it returns.
That is why send() returns almost instantly. It does the serializers, the partitioner and the buffer. All of that is fast, in-memory work. It does not wait for the network.
The Sender: The Producer's Own Thread
Look at the green box. When you created the KafkaProducer, it also started one background thread (it starts at that moment, not at your first send()). You can see its name in your output:
kafka-producer-network-thread | event-tracking-service-demo
The name has two parts. The first part is the same in every Java producer. The second part is our client.id. That is one place where client.id helps: when you look at a thread dump, you can tell which producer a thread belongs to.
This thread is called the sender, or the I/O thread. Its job is to take the waiting batches, and send each batch to the broker that leads its partition. This runs all the time, in parallel with your loop.
Why do it this way? Why not send each message at once?
Because the network is slow, compared to memory. A network round trip for every single message would make the producer very slow. Instead, the producer lets messages collect for a short time, and sends them as one batch. One round trip carries many messages. That is why the design has a buffer and a background thread. The waiting time is a setting called linger.ms, and its default is only 5 milliseconds. We tune it in a later lecture.
The Return Half: Finding Out What Happened
The broker writes the batch, and answers with an acknowledgment. The answer comes back over the same connection. The sender thread receives it and matches it to the request it belongs to. (Many requests can be on their way at once, so every request has an ID for this purpose.)
Then the sender does two things for every message in the batch:
- It completes the
Futurethatsend()returned. - It calls your callback.
Your callback runs on the sender thread, not on your main thread. That is what the thread name in your output showed. In Java, nobody needs to ask for it.
This design has consequences:
- Your callback runs at the same time as your main code. If both change the same data, you must protect it. (Our callback only prints, which is safe.)
- The sender thread is shared by every message. A slow callback slows down all sending, because the sender cannot send while it is busy with your code. Keep callbacks short.
- One acknowledgment covers a whole batch. So callbacks for several messages arrive together, one after another.
This is also why partition and offset appear only inside the callback, and never as a return value of send(). At the moment send() returns, the message has not even been sent, so it has no offset yet.
Answering Question 1: Who Ran the Callback, and Why So Late?
Let's follow our loop:
send()puts message 1 into the buffer and returns in a moment. We printQueued.- The loop repeats for all 20 messages. Each
send()takes only microseconds, so the whole loop is very fast. - Meanwhile, the sender thread waits up to 5 ms for more messages to gather, connects to the brokers, and sends the batches. Then the acknowledgments must travel back.
All of that takes longer than our loop. So the Queued lines come first. The Delivered lines are printed later, by the sender thread, as the answers arrive. The exact mix of lines depends on timing, and will differ from run to run.
Finally, flush() tells the producer: "Do not wait for more messages. Send everything now, and block until every message has an answer." When it returns, all callbacks have run.
Output / NoteTry it yourself. Add a small pause after each message. First, change the method line to
public static void main(String[] args) throws InterruptedException. Then, after theSystem.out.println("Queued ...line, addThread.sleep(300);. Run it again. Now each message has time to complete a round trip before the next one is sent, so theDeliveredlines show up between theQueuedlines, not after them. The producer works the same way. Only the timing changed.
Answering Question 2: Who Picked the Partition?
The partitioner, inside send(), using the key. You saw the proof in the output: every time the same user ID appears, it has the same partition.
You can even predict it. For a topic with three partitions, our seven users land here:
| User | Partition |
|---|---|
| user-501 | 2 |
| user-502 | 1 |
| user-503 | 1 |
| user-504 | 0 |
| user-505 | 0 |
| user-506 | 0 |
| user-507 | 0 |
Compare this table with your Delivered lines. They match. (Only while the topic has exactly three partitions. If you add partitions later, the hash gives different answers.)
What if there is no key?
Then there is nothing to hash. The producer sends a whole batch to one partition, and moves to another partition for the next batch. Over time, messages spread across all partitions. But there is no per-user order.
Want to See Every Setting the Producer Uses?
Open simplelogger.properties. Change the line
org.slf4j.simpleLogger.log.org.apache.kafka=warn
to
org.slf4j.simpleLogger.log.org.apache.kafka=info
Run the producer again. At the start, the client prints a long list called ProducerConfig values. Every setting is there, with its value, including all the defaults. Find these:
linger.ms = 5batch.size = 16384acks = allenable.idempotence = truemax.block.ms = 60000
Two of them, acks and enable.idempotence, are already switched on for safety in the Java client. You will see what they do soon. Change the file back to warn when you are done.
Common Mistakes at This Stage
Ignoring exception in the callback. send() returning without an error tells you nothing about delivery. Failures are reported in the callback.
Calling send(...).get() after every message. get() waits until Kafka answers, so each message takes a full round trip, and batching is lost. Your producer becomes very slow. Use the callback instead.
Putting slow work in the callback. It runs on the sender thread, and it slows down all sending.
Never closing the producer. If your program ends without close() or flush(), messages still in the buffer are lost. Try-with-resources takes care of it.
Creating a new KafkaProducer for every message. Every producer starts a thread and opens connections. Create it once and reuse it. It is safe to share one producer between many threads, and this is usually faster than using several.