Building the Bronze Layer — Auto Loader as a Streaming Table
So far in this chapter we've covered SDP's vocabulary and syntax. Now it's time to build something real. Over this lecture and the next two, we'll build a complete end-to-end medallion pipeline using the Spark Declarative Pipeline framework — bronze in this lecture, silver in the next, and gold in the one after that. Everything here runs on the Databricks Free Edition.
Creating the Pipeline
Rather than creating a pipeline from the generic "New" menu or from Jobs & Pipelines, create it from
inside your working folder — the one that's already linked to source control. In this course, that's
the dbx_course folder in the workspace.
Inside dbx_course, create a pipelines folder, and create the ETL Pipeline from there:
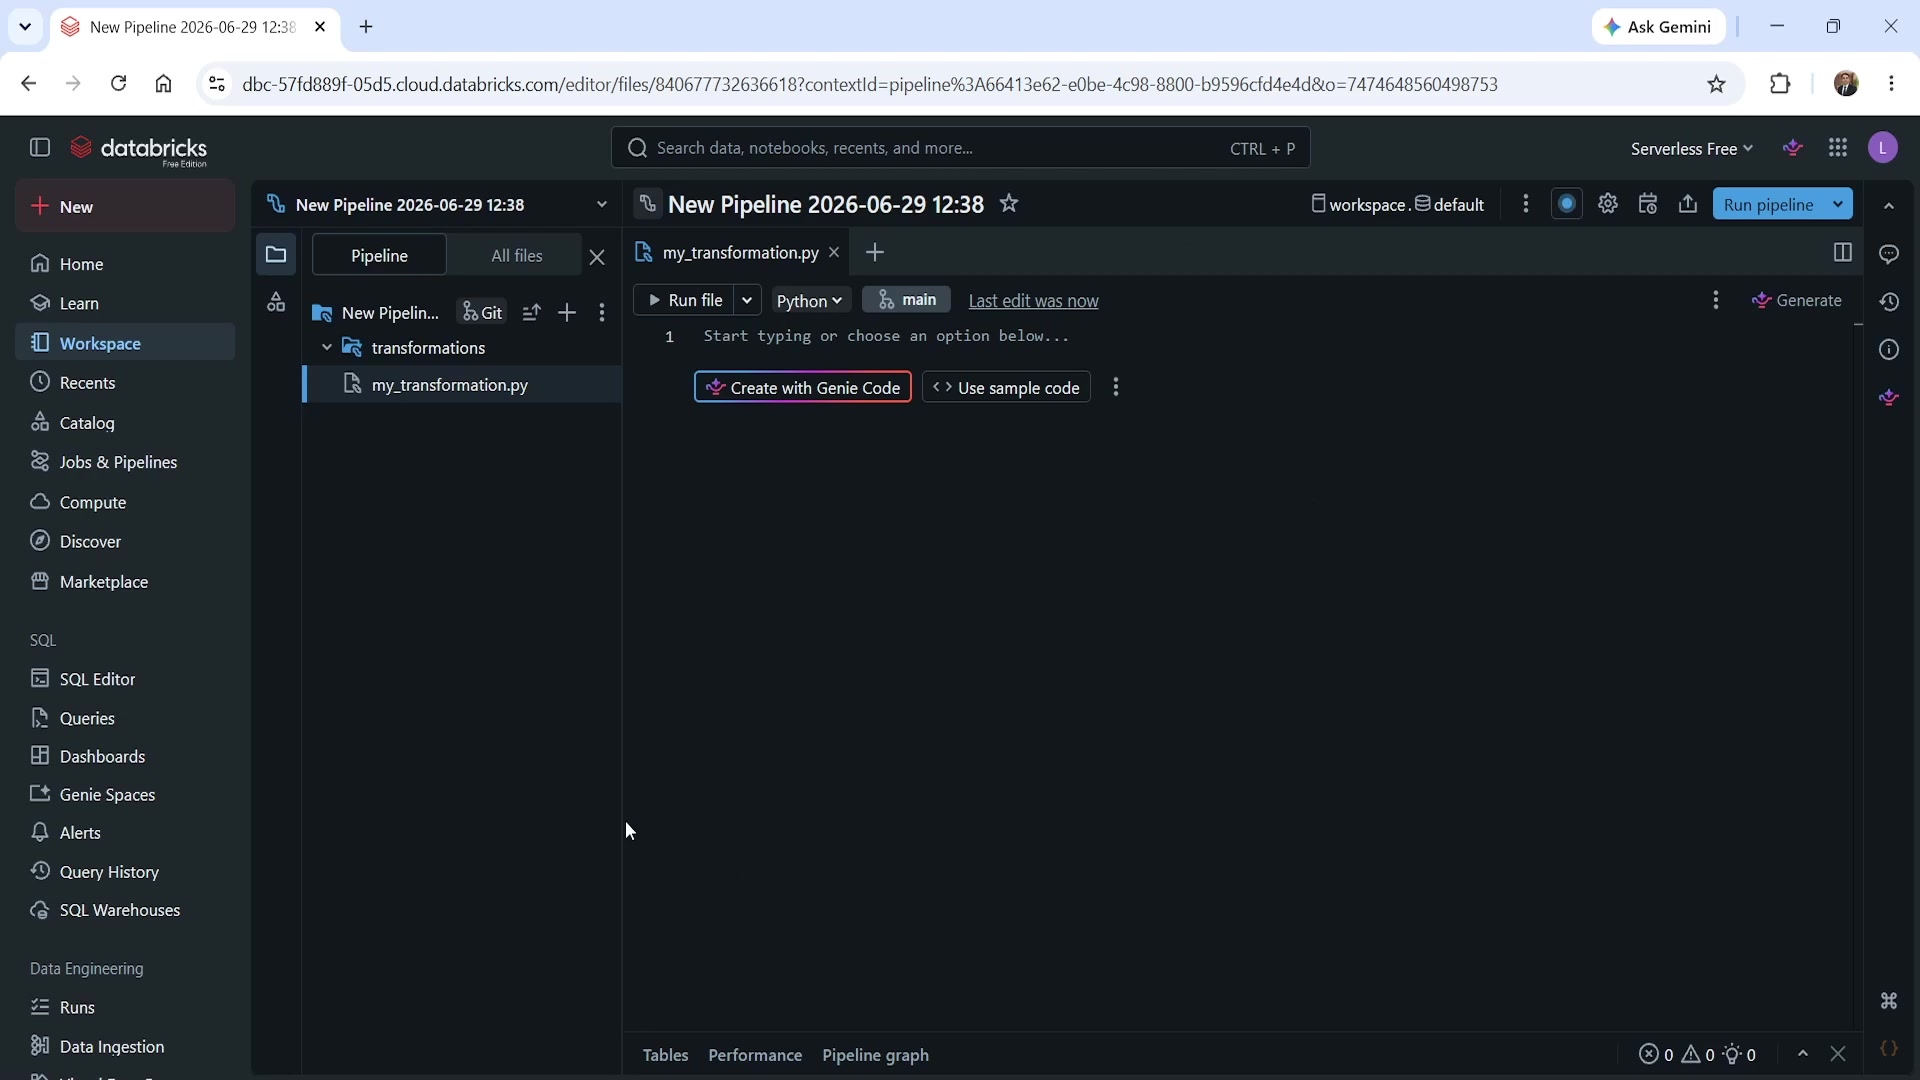 The SDP pipeline editor IDE — default layout
Doing it this way matters: if you instead create the pipeline from elsewhere (the general "New" menu, or Jobs & Pipelines), Databricks creates the pipeline's folder structure at a default home location for your user — and moving it into source control afterward is extra manual work. Starting inside your git-linked folder avoids that entirely.
This lands you in the pipeline editor — a completely different IDE from the notebook environment
you've used so far. It's a plain Python file editor, not a notebook. Pipelines can technically be
built in notebooks, but since SDP pipelines are pure Python, editing and running them as .py files
is simpler, and that's what this course uses throughout.
By default, a new pipeline creates:
- A pipeline folder (named something like "New Pipeline" plus a timestamp)
- A
transformationsfolder inside it - A single starter file,
my_transformation.py
A few configuration steps before writing any code:
- Rename the pipeline and its root folder to something meaningful — this course uses
sdp-medallion-pipelinefor both. - Set the target catalog and schema. This is where the pipeline's tables will land. Here, that's
the
devcatalog anddbx_courseschema. - Rename
my_transformation.pyto something that reflects what it does — in this case,bronze.py, since this file will hold every bronze-layer flow.
The pipeline settings panel (opened automatically the first time, and available afterward via the gear icon) also shows the pipeline's internal ID, its mode (Triggered, meaning it runs manually when you trigger it — not on a schedule), the root folder and source code folder configuration, and compute settings (serverless, with an environment version — this course uses the default). None of that needs to change for now; scheduling and jobs are covered in a later chapter.
One structural note worth remembering as the pipeline grows: one flow per source table is typical,
and it's good practice to organize source files by layer — all bronze flows in bronze.py, all
silver flows in a separate file, and so on. The collection of every flow across every file is the
pipeline.
Preparing the Source Data
Before writing any pipeline code, a few cleanup and setup steps:
- Check the target schema for pre-existing tables. The pipeline creates and manages its own tables — you should never manually create them. If a table the pipeline is about to create already exists (for example, leftover from an earlier lecture), delete it first, or the pipeline run will fail.
- Clean up the landing volume. If
_schemaor_checkpointfolders exist from earlier Auto Loader lectures, delete them — this pipeline will create its own_schemafolder, and old state would conflict with it. - Upload fresh source files. For this exercise:
cdc_customers_batch1.csvinto/Volumes/dev/dbx_course/landing/customers/, andcdc_orders_batch1.csvinto/Volumes/dev/dbx_course/landing/orders/.
The source files themselves matter here, because they're shaped differently than the plain CSVs used in earlier lectures. These are meant to represent the output of Debezium — a real-world CDC tool that connects to a source database (or consumes from Kafka) and writes flattened change-data-capture records to cloud storage. Each row carries a few extra fields Debezium adds automatically:
op— the operation type:c(create),u(update), ord(delete).ts_ms— a timestamp in epoch milliseconds, marking when Debezium processed the record.__deleted—trueorfalse, flagging whether the row represents a delete tombstone.
Everything else in the row is the actual business data (order_id, customer_id, and so on).
Knowing this structure up front is what lets the bronze layer code below make sense.
Writing the Bronze Layer
The requirement is simple: read whatever lands in each folder of the landing zone, and append it —
untouched — into a bronze layer table. No merging, no transformation, no filtering. Insert, update,
or delete: every event lands in bronze exactly as it arrived. That's what makes append flow the
right choice here. And since orders has exactly one source feeding one target (and the same for
customers), implicit form (@dp.table) is all that's needed — no need for the explicit two-step form.
Here's the complete bronze.py:
pythonfrom pyspark import pipelines as dp from pyspark.sql.functions import col # ───────────────────────────────────────────────────────────────── # Bronze layer — raw CDC event landing # # Auto Loader reads Debezium-flattened CDC files from the landing # volume and appends them to streaming tables exactly as received. # No filtering, no transformation. Every event — INSERT, UPDATE, # DELETE — lands here with Bronze metadata columns attached. # # Bronze is append-only. It is the immutable audit trail of every # CDC event that arrived. Silver applies the SCD logic. # # Debezium flattened format fields: # op — operation: 'c' (create), 'u' (update), 'd' (delete) # ts_ms — Debezium processing timestamp, epoch milliseconds # __deleted — 'true' for delete tombstones (Debezium SMT) # (business columns from the 'after' field) # ───────────────────────────────────────────────────────────────── ORDERS_LANDING_PATH = "/Volumes/dev/dbx_course/landing/orders/" CUSTOMERS_LANDING_PATH = "/Volumes/dev/dbx_course/landing/customers/" SCHEMA_LOCATION_BASE = "/Volumes/dev/dbx_course/landing/_schema" @dp.table(name="bronze_orders_cdc", comment="Raw Debezium CDC events for orders — append-only landing table") @dp.expect("op_is_valid", "op IN ('c', 'u', 'd')") @dp.expect_or_drop("ts_ms_not_null", "ts_ms IS NOT NULL") def bronze_orders_cdc(): return ( spark.readStream .format("cloudFiles") .option("cloudFiles.format", "csv") .option("cloudFiles.inferColumnTypes", "true") .option("cloudFiles.schemaLocation", SCHEMA_LOCATION_BASE + "/orders") .option("header", "true") .load(ORDERS_LANDING_PATH) .select("*", col("_metadata.file_modification_time").alias("_ingest_timestamp"), col("_metadata.file_path").alias("_source_file") ) ) @dp.table(name="bronze_customers_cdc", comment="Raw Debezium CDC events for customers — append-only landing table") @dp.expect("op_is_valid", "op IN ('c', 'u', 'd')") @dp.expect_or_drop("ts_ms_not_null", "ts_ms IS NOT NULL") def bronze_customers_cdc(): return ( spark.readStream .format("cloudFiles") .option("cloudFiles.format", "csv") .option("cloudFiles.inferColumnTypes", "true") .option("cloudFiles.schemaLocation", SCHEMA_LOCATION_BASE + "/customers") .option("header", "true") .load(CUSTOMERS_LANDING_PATH) .select( "*", col("_metadata.file_modification_time").alias("_ingest_timestamp"), col("_metadata.file_path").alias("_source_file"), ) )
Reading the two expectations
Bronze layer tables normally shouldn't carry data quality rules — whatever arrives should be taken as-is. But two fields here are critical enough to be worth checking even at bronze:
op_is_valid(@dp.expect, warn-only) —opshould always bec,u, ord, since that's the full set of values Debezium's own CDC implementation can produce. If something else shows up, it signals a problem upstream in the ingestion tool — worth logging, but not worth failing or dropping the row over.ts_ms_not_null(@dp.expect_or_drop, drop on violation) — this is the timestamp AUTO CDC will later rely on to sequence events correctly in the silver layer. A missing value here isn't just bad data — it's genuinely dangerous, since it risks letting a late-arriving old record silently overwrite a newer one downstream. This one is worth actually dropping the row over.
What's missing, compared to raw Auto Loader
If you compare this to the manually-written Auto Loader script from earlier in the course, notice
what's not here: no checkpointLocation, no .writeStream, no .trigger(), no
.awaitTermination(). You define the target table, the data quality rules, and where to read from —
SDP resolves the rest: incremental processing, schema evolution, and checkpoint management are all
handled by the framework.
Running It
With two flows defined in bronze.py, running the file (rather than the whole pipeline, since silver
and gold don't exist yet) triggers SDP to read the source file, resolve the flows inside it, build an
execution graph, and run it on serverless compute:
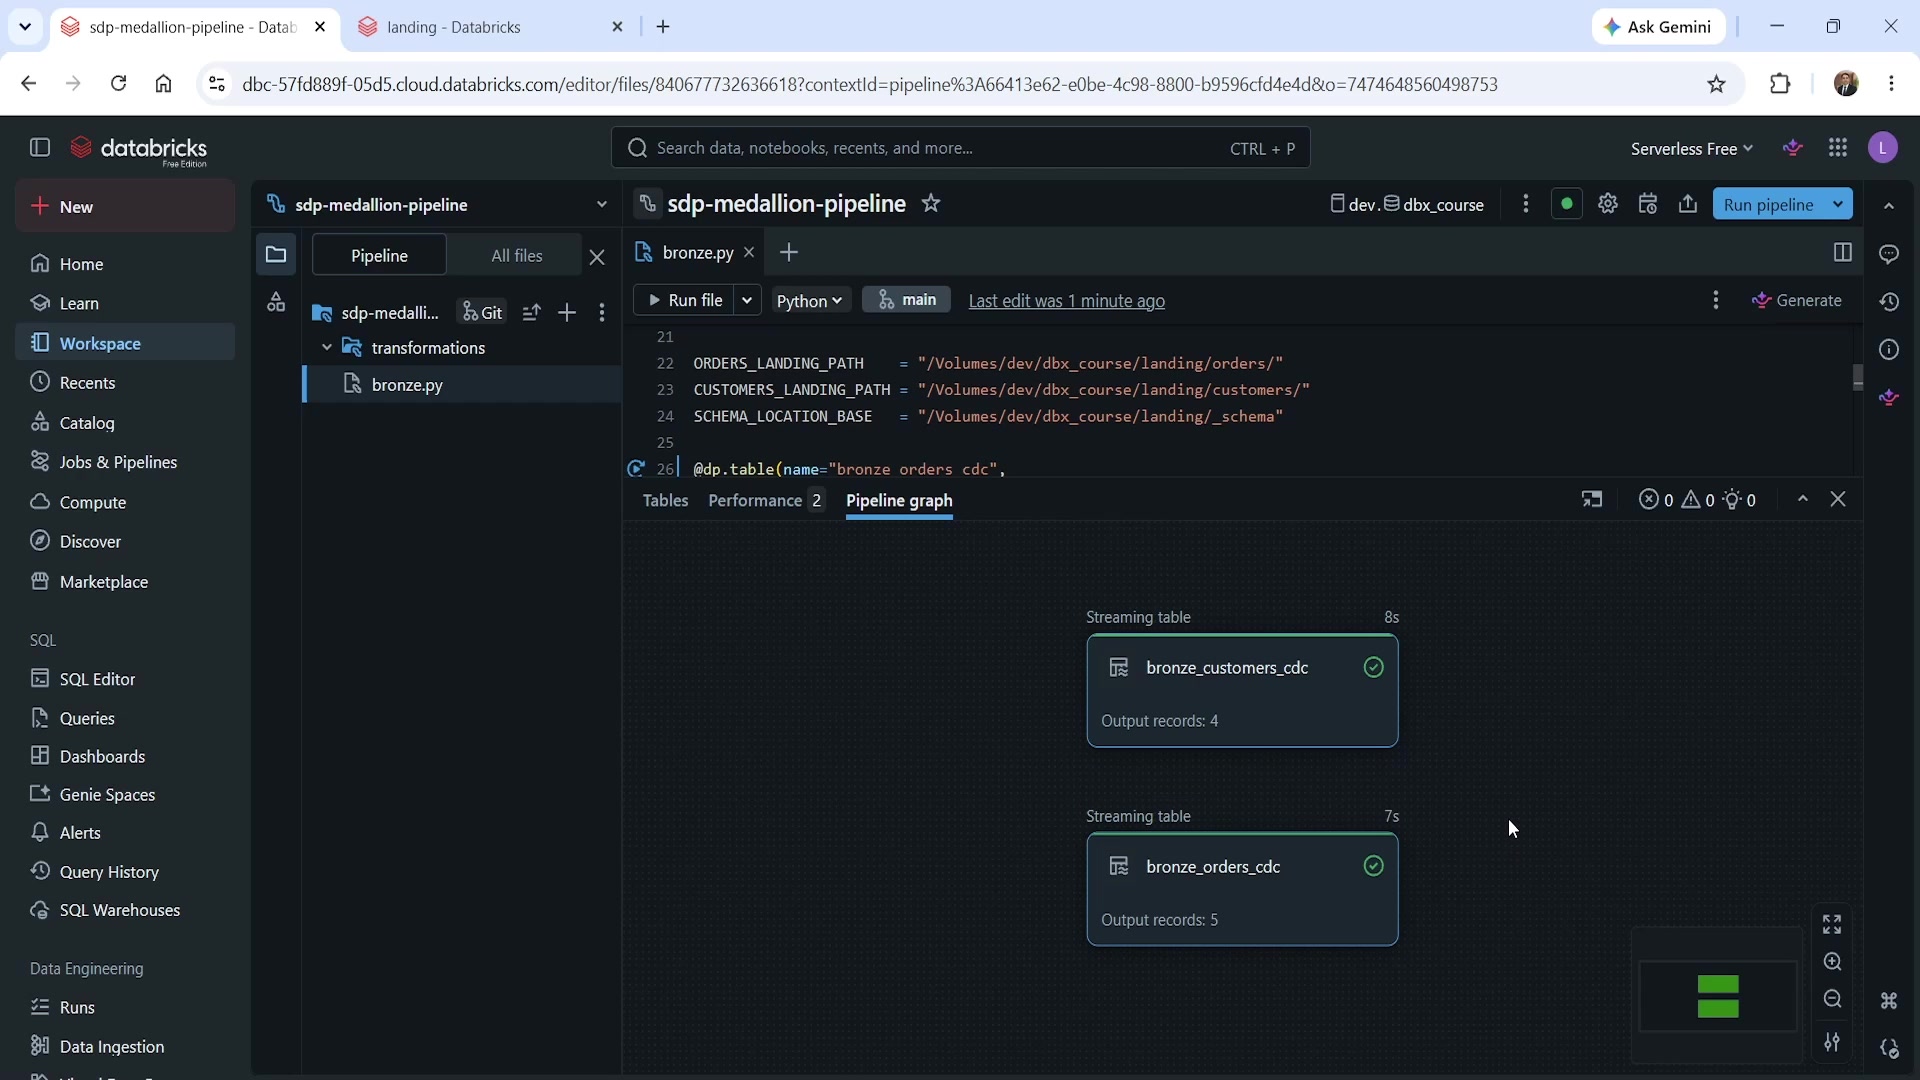 Pipeline graph after a successful bronze-layer run
Both tables completed successfully — bronze_customers_cdc with 4 output records, bronze_orders_cdc
with 5. Notice the two nodes have no connection between them in the graph: at this stage, they're
completely independent flows. As silver and gold layers get added to the pipeline in the next two
lectures, this graph will grow to show the actual lineage between layers.
Inspecting the resolved schema of bronze_orders_cdc confirms exactly what the code should produce:
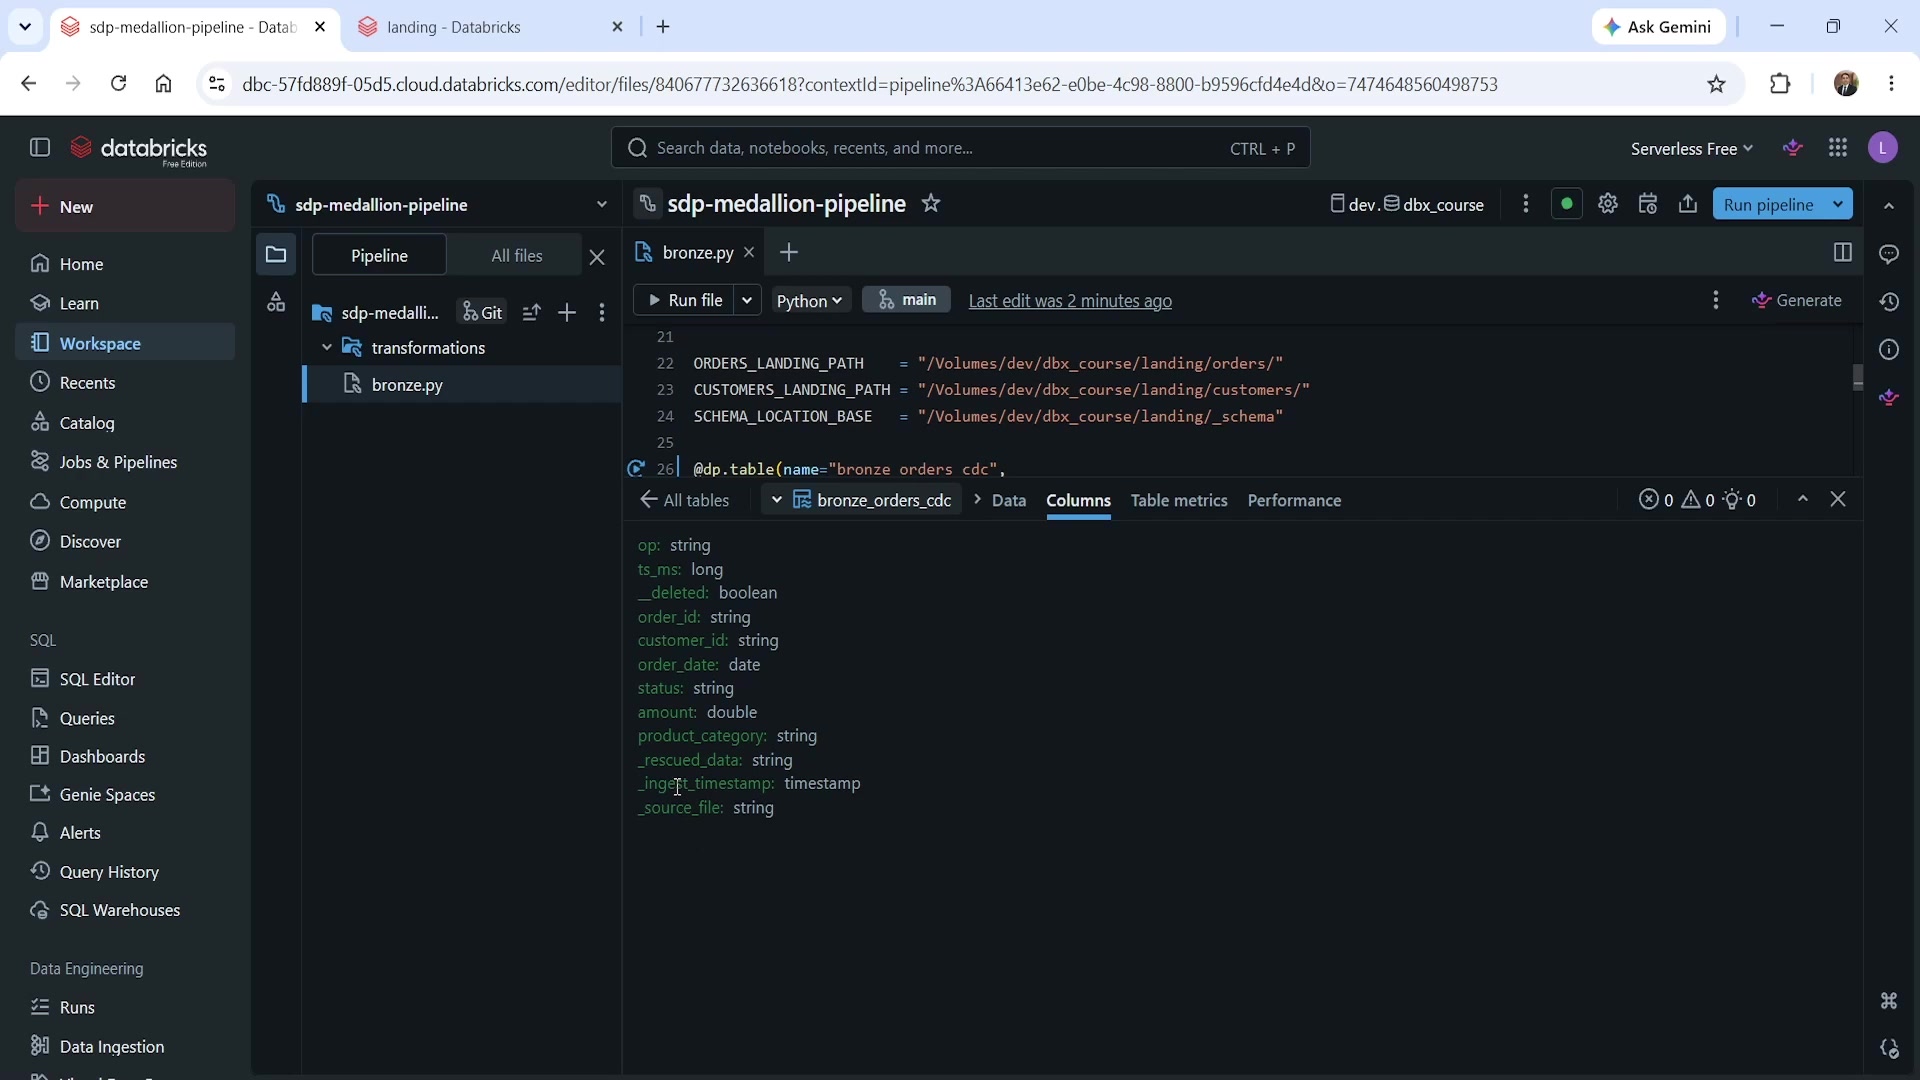 Resolved schema of bronze_orders_cdc
The Debezium fields (op, ts_ms, __deleted) and business columns (order_id, customer_id,
order_date, status, amount, product_category) came through as expected, alongside three
columns SDP or Auto Loader added automatically: _rescued_data (Auto Loader's standard field for
malformed values), and the two bronze metadata columns this code explicitly added —
_ingest_timestamp and _source_file.
A Note on Project Structure: The Explorations Folder
The pipeline editor supports a few special folder types beyond transformations: exploration,
utility, and test. The exploration folder is worth knowing about early — it's meant for
notebooks you use to spot-check your pipeline's output during development, without those notebooks
becoming part of the pipeline itself.
Any file placed in the exploration folder is automatically excluded from the pipeline's source code
configuration — it's not read, and it's not run when the pipeline executes. Only the
transformations folder is treated as pipeline source, both during development and once the
pipeline is deployed to production. A typical use here: a quick notebook that runs
spark.table("dev.dbx_course.bronze_orders_cdc").display() (or the SQL equivalent,
SELECT * FROM bronze_orders_cdc) just to confirm data landed correctly after a run — without that
verification query ever being mistaken for part of the pipeline's actual logic.
Summary
| Concept | Key point |
|---|---|
| Pipeline creation | Create from inside your git-linked folder (not the generic New menu) so the pipeline folder lands in source control automatically |
| Pipeline editor | A plain Python file editor, not a notebook — this is where all SDP source code lives |
transformations folder | The only folder SDP actually reads as pipeline source, in development and production alike |
| Bronze layer pattern | Implicit append flow (@dp.table) — one source, one target, no transformation |
| Bronze expectations | Sparingly used — only for fields critical enough to break downstream logic if wrong (here: op validity and ts_ms non-null) |
| What SDP replaces | No checkpoint location, no .writeStream, no .awaitTermination() — SDP manages incrementality, schema evolution, and checkpoints itself |
| Pipeline graph | Shows each flow as a node; independent bronze tables show no connections yet — lineage appears as silver/gold are added |
| Exploration folder | For spot-check notebooks during development; explicitly excluded from pipeline execution |
Next lecture, we extend this same pipeline and add the silver layer flows — where the actual CDC merge logic happens.
See you again. Keep learning, and keep growing!