Databricks Utilities and Widgets
In this lecture, let's learn about Databricks Utils (dbutils) and Widgets.
dbutils is a package that offers a set of utilities, conceptually similar to what magic commands give you. Widgets are actually part of the dbutils package too — we'll get to them a bit later in this lecture.
Setup
Create a new notebook in your exercises folder — let's call it 04-dbutils-widgets. Attach a cluster so we can run code.
Discovering What's Available: dbutils.help()
dbutils gives you access to a number of tools — you can see the full list by running:
pythondbutils.help()
This shows tools like credentials, data, fs, jobs, library, widgets, and more. You won't need most of them — many are experimental or rarely used. In this lecture, we'll focus on the three most commonly used ones: fs, widgets, and notebook.
The pattern for using any of these tools is the same, so once you're comfortable with these three, picking up any other dbutils tool later will feel familiar.
To get help on a specific tool, use .help() on it:
pythondbutils.fs.help()
dbutils.fs — Working With the File System
dbutils.fs is a tool for working with the Databricks File System (DBFS) — the same kind of thing the %fs magic command gives you.
So why do we need both? Simple: %fs is a command — you run it and get output, but that's it. dbutils.fs is a Python package — you can use it inside your Python programs, scripts, and automation. That's the real reason it exists alongside the magic command.
Listing a Directory
pythonfiles = dbutils.fs.ls("/databricks-datasets") for file in files: print(f"{file.name:<40} {file.size:>10} bytes")
dbutils.fs.ls() returns a list of FileInfo objects — each with path, name, size, and modification time. Since it's a real Python object (not just printed text), you can capture it in a variable and process it however you like — loop through it, filter it, format the output — exactly like any other Python data.
Creating a Directory and Writing a File
pythondbutils.fs.mkdirs("/Workspace/Shared/Config") config_content = """ env=development raw_path=raw_data_path silver_path=silver_data_path gold_path=gold_data_path """ dbutils.fs.put("/Workspace/Shared/Config/application.conf", config_content, True)
Here, mkdirs creates a directory, and dbutils.fs.put() writes content to a file inside it. The put method takes three things: the file path, the content to write, and a boolean for whether to overwrite the file if it already exists.
Run this, and you'll see confirmation like True and Wrote 94 bytes. You can verify it directly in your workspace explorer — navigate to Shared → Config, and you'll find application.conf with exactly the content you wrote.
Deleting a Directory
pythondbutils.fs.rm("/Workspace/Shared/Config", True)
The second parameter, recurse=True, tells it to delete the directory and everything inside it. Run this, refresh your workspace explorer, and the Config directory is gone.
That covers the basics of dbutils.fs. There are more file system commands available (copying files, etc.) — you'll pick those up as needed throughout the course.
Widgets: Parameterizing a Notebook
Now let's look at widgets — one of the most useful dbutils tools for real project work.
The Motivation
Let's say we have a simple notebook that reads a CSV file and counts its rows. Create a new notebook called 05-row-counter:
pythondf = ( spark.read .option("header", "true") .option("inferSchema", "true") .csv(file_path) ) row_count = df.count() print(f"Row count: {row_count}")
This works fine — but the file path is hardcoded. What if we want this same notebook to work with any file, not just one specific one? That's exactly what widgets solve: they let you turn a notebook into something that behaves like a parameterized function — pass in different inputs, get different outputs, without editing the code itself.
Creating a Text Widget
You can check what widget types are available with:
pythondbutils.widgets.help()
dbutils.widgets supports several types: combobox, dropdown, multiselect, and text. Dropdown limits you to selecting one option from a fixed list; multiselect allows choosing multiple; text is the simplest and most commonly used — a free-form text input.
Let's create a text widget for our file path:
pythondbutils.widgets.text("file_path_value", "/databricks-datasets/Rdatasets/data-001/csv/ggplot2/diamonds.csv", "Provide your file path") file_path = dbutils.widgets.get("file_path_value") print(f"Got input: {file_path}")
dbutils.widgets.text() takes three arguments: the widget name, a default value, and a label (what's displayed to the user). Once created, dbutils.widgets.get("file_path_value") retrieves whatever value is currently in that widget.
Run this cell, and a text box appears right at the top of your notebook:
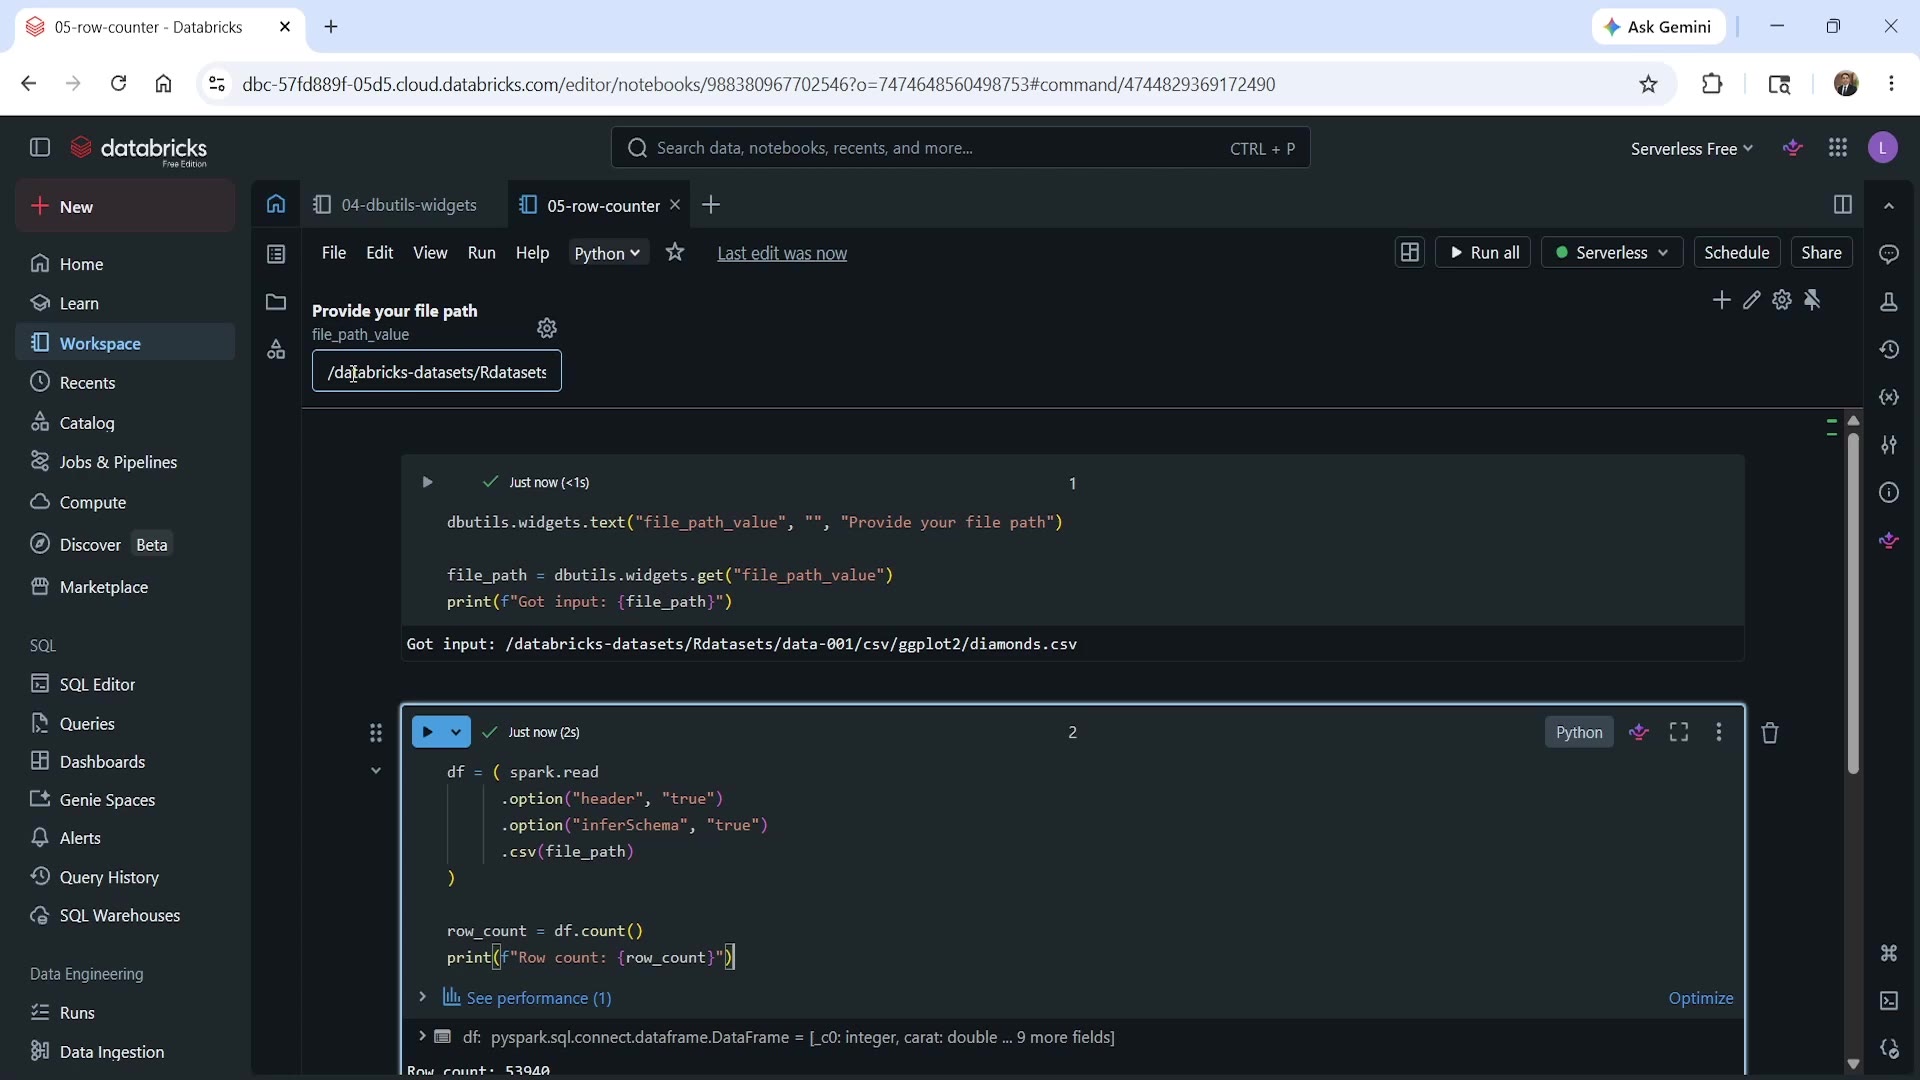 Widget text box at the top of the notebook
This is a genuinely interactive UI element — you can type a different file path directly into that box, re-run your cells, and the notebook picks up the new value immediately. This makes it easy to test your notebook independently with several different inputs before wiring it up into a larger pipeline.
The Complete Row Counter Notebook
Putting it together, here's the full 05-row-counter notebook:
pythondbutils.widgets.text("file_path_value", "/databricks-datasets/Rdatasets/data-001/csv/ggplot2/diamonds.csv", "Provide your file path") file_path = dbutils.widgets.get("file_path_value") print(f"Got input: {file_path}")
pythondf = ( spark.read .option("header", "true") .option("inferSchema", "true") .csv(file_path) ) row_count = df.count() print(f"Row count: {row_count}") dbutils.notebook.exit(row_count)
Notice the last line: dbutils.notebook.exit(row_count). We'll explain this next.
dbutils.notebook — Calling and Returning From Notebooks
dbutils.notebook gives you exactly two methods:
exit(value)— returns a value from a notebook, similar to areturnstatement in a function.run(path, timeout, arguments)— calls (runs) another notebook, optionally passing it parameters.
Together, these two let an entire notebook behave like a callable function — with inputs (via widgets) and an output (via exit).
Returning a Value
We already added dbutils.notebook.exit(row_count) at the end of 05-row-counter. Run the notebook on its own, and you'll see confirmation like "Notebook exited: 53940" — confirming it worked, and that the row count is being properly returned, not just printed.
Calling It From Another Notebook
Now, back in 04-dbutils-widgets, let's call 05-row-counter and pass it a specific file path:
pythonresult = dbutils.notebook.run("./05-row-counter", 120, {"file_path_value": "/databricks-datasets/Rdatasets/data-001/csv/ggplot2/diamonds.csv"}) print(f"Result: {result}")
A few things to note about dbutils.notebook.run():
- The first argument is the path to the notebook you want to run (this is essentially the same concept as the
%runmagic command, but as a callable Python method, with the added ability to pass arguments). - The second argument is a timeout in seconds — if the target notebook doesn't finish within this time, it gets terminated. This protects you from getting stuck waiting indefinitely if something goes wrong.
- The third argument is a dictionary of arguments — key-value pairs matching your target notebook's widget names.
Run this, and Databricks creates what's called a notebook workflow — it actually launches 05-row-counter as a job run, waits for it to complete, and returns the value passed to dbutils.notebook.exit(). You'll see a clickable run link in the output; opening it takes you to a detailed run view:
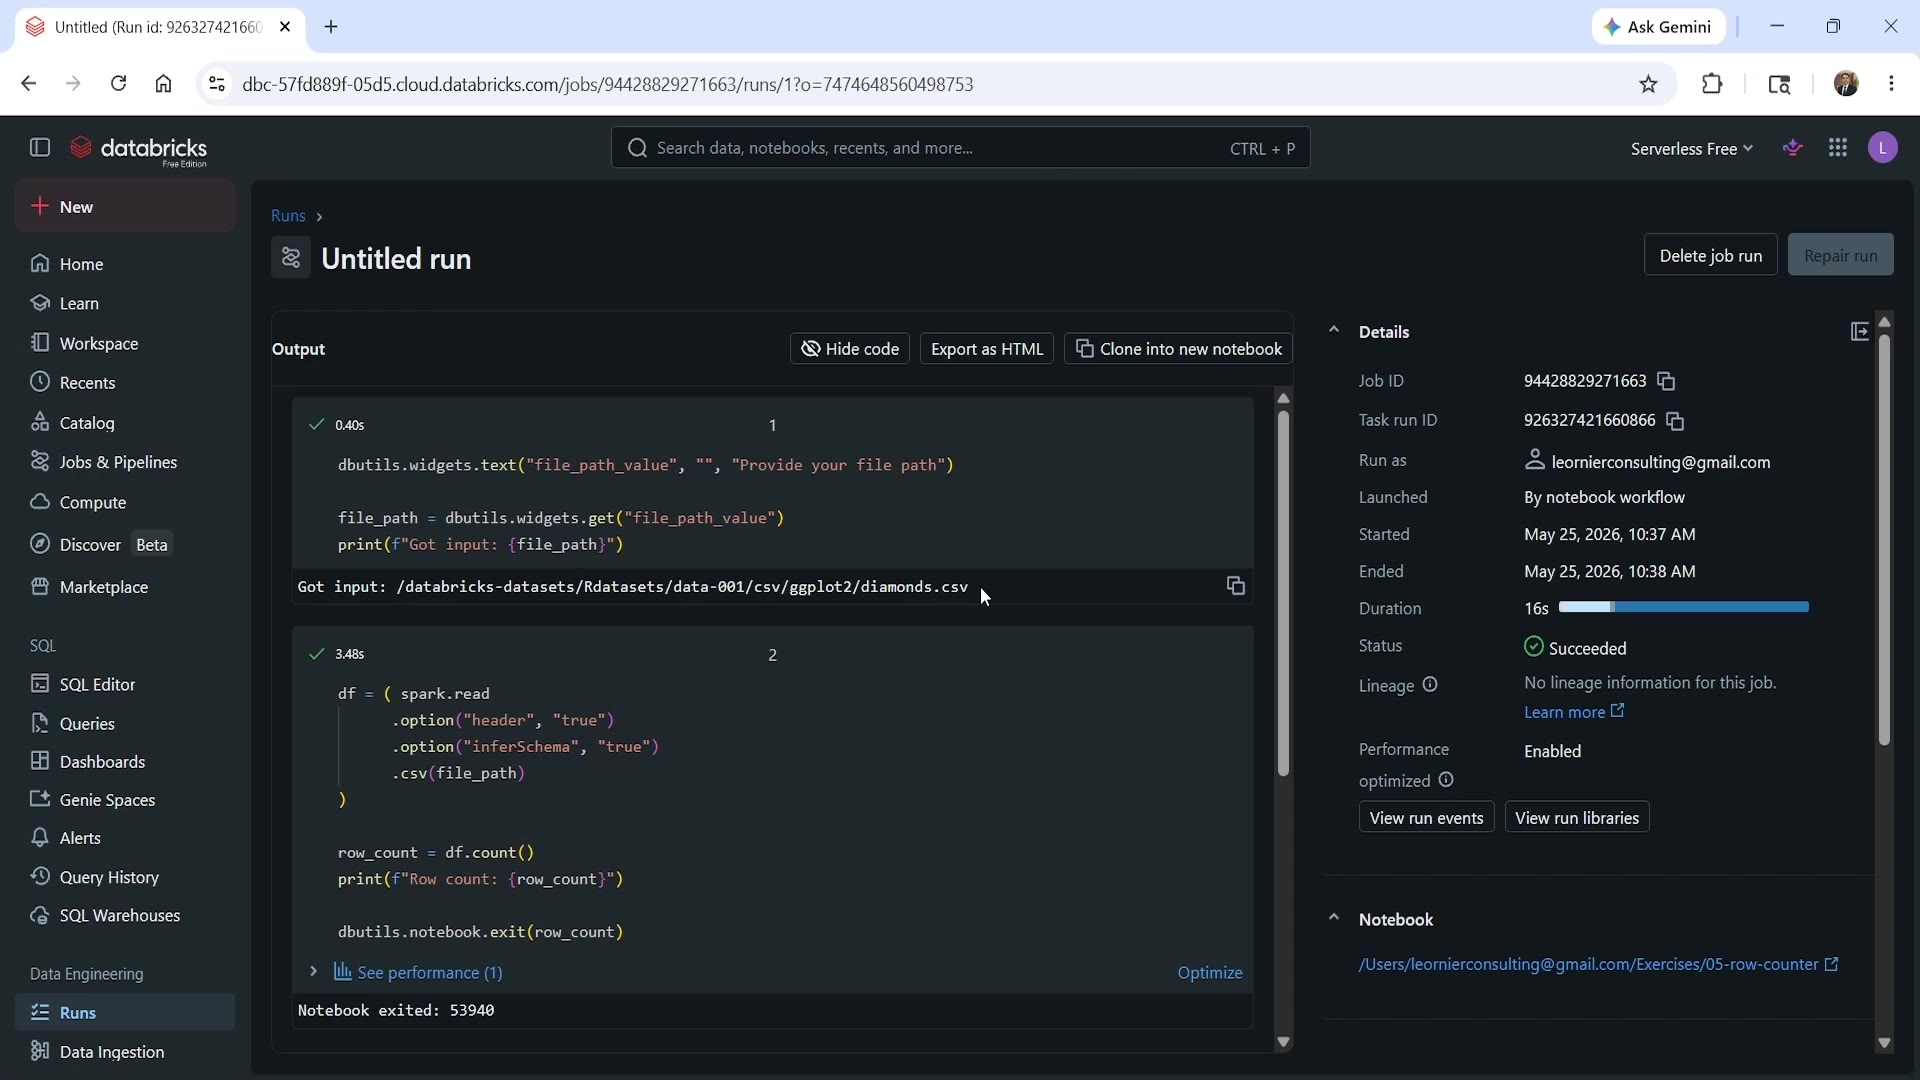 Notebook run workflow detail page
This page shows you exactly what happened: the input passed in, each cell's output, the final exit value, overall run status ("Succeeded"), duration, and more — everything you'd want to confirm the run went as expected.
A Couple of Practical Notes
Default values matter. If you call dbutils.notebook.run() without passing an argument for a widget that has no default, it'll throw an error. Giving your widget a sensible default value (as we did above) avoids this.
The widget UI isn't strictly required. You don't actually need to create the widget UI element (dbutils.widgets.text(...)) for parameterization to work — you can call dbutils.notebook.run() with arguments even if the target notebook never creates a visible widget, as long as it calls dbutils.widgets.get(...) to retrieve the value. The widget UI is mainly useful when you want to manually and interactively test a notebook with different values yourself. For notebooks only ever called programmatically (from another notebook or a job), the UI isn't necessary — you just need the get() call.
Summary
| Tool | Purpose |
|---|---|
dbutils.help() | Lists all available dbutils tools |
dbutils.fs | File system operations (ls, mkdirs, put, rm, etc.) — same as %fs, but usable in Python code |
dbutils.widgets.text(name, default, label) | Creates a text input widget, turning a notebook into a parameterized "function" |
dbutils.widgets.get(name) | Retrieves the current value of a widget |
dbutils.notebook.exit(value) | Returns a value from a notebook |
dbutils.notebook.run(path, timeout, args) | Runs another notebook, optionally passing arguments, and captures its returned value |
That's the essence of dbutils and widgets — tools that let you parameterize, automate, and chain notebooks together, which becomes especially powerful once we start building multi-notebook pipelines later in this course.
See you again. Keep learning, and keep growing!