Workspace Files vs Git Folders
In this lecture, let's learn about two ways to store your work in the Databricks workspace: Workspace Files and Git Folders. We'll look at how to use each, and understand the differences, advantages, and when to use which one.
Where Have Our Files Been Living All Along?
Throughout this course, we've created an exercises folder and a bunch of notebooks inside it — but we never actually asked: where are these files stored, and how are they managed?
The answer: these are Workspace Files. Everything we've created so far — every notebook, every folder — lives as a workspace file.
What Are Workspace Files?
Workspace files are exactly what they sound like: files stored directly inside the Databricks workspace. Think of the workspace as a cloud-hosted file system that's available the moment you log in — nothing to set up or configure.
Workspace files aren't limited to notebooks. You can also store:
- Plain Python modules (
.pyfiles) - YAML configuration files
- JSON files
- Small CSV or text files
This means you can structure a workspace project the same way you'd structure a project on your local machine — a main notebook, a utilities folder with shared modules, a config file, all living together.
A Quick Demo
Let's create a new folder inside exercises called workspace-demo, and inside it, a notebook called analysis-notebook.
Now let's also bring in a plain Python file. We have a small utility module, data_helpers.py:
python# data_helpers.py # Plain Python utility module stored as a Workspace File def format_number(value, prefix="", suffix=""): """Format a number with thousands separator and optional prefix/suffix.""" return f"{prefix}{value:,.2f}{suffix}" def log_pipeline_step(step_name, input_count, output_count): """Print a formatted pipeline step summary.""" pct = (output_count / input_count * 100) if input_count > 0 else 0 print(f"[PIPELINE] {step_name}") print(f" Input rows : {input_count:>10,}") print(f" Output rows: {output_count:>10,} ({pct:.1f}% retained)") def get_pipeline_config(env="development"): """Return environment-specific pipeline configuration.""" configs = { "development": { "raw_path" : "/FileStore/dbx-de-course/raw/", "silver_path": "/FileStore/dbx-de-course/silver/", "gold_path" : "/FileStore/dbx-de-course/gold/", "log_level" : "DEBUG" }, "production": { "raw_path" : "s3://my-bucket/raw/", "silver_path": "s3://my-bucket/silver/", "gold_path" : "s3://my-bucket/gold/", "log_level" : "INFO" } } return configs.get(env, configs["development"])
You can simply drag and drop a Python file like this straight into your workspace folder using the Import option — it becomes a regular workspace file, sitting right alongside your notebooks.
No Save Button — And That's the Point
Open this Python file (or any notebook), and check the File menu:
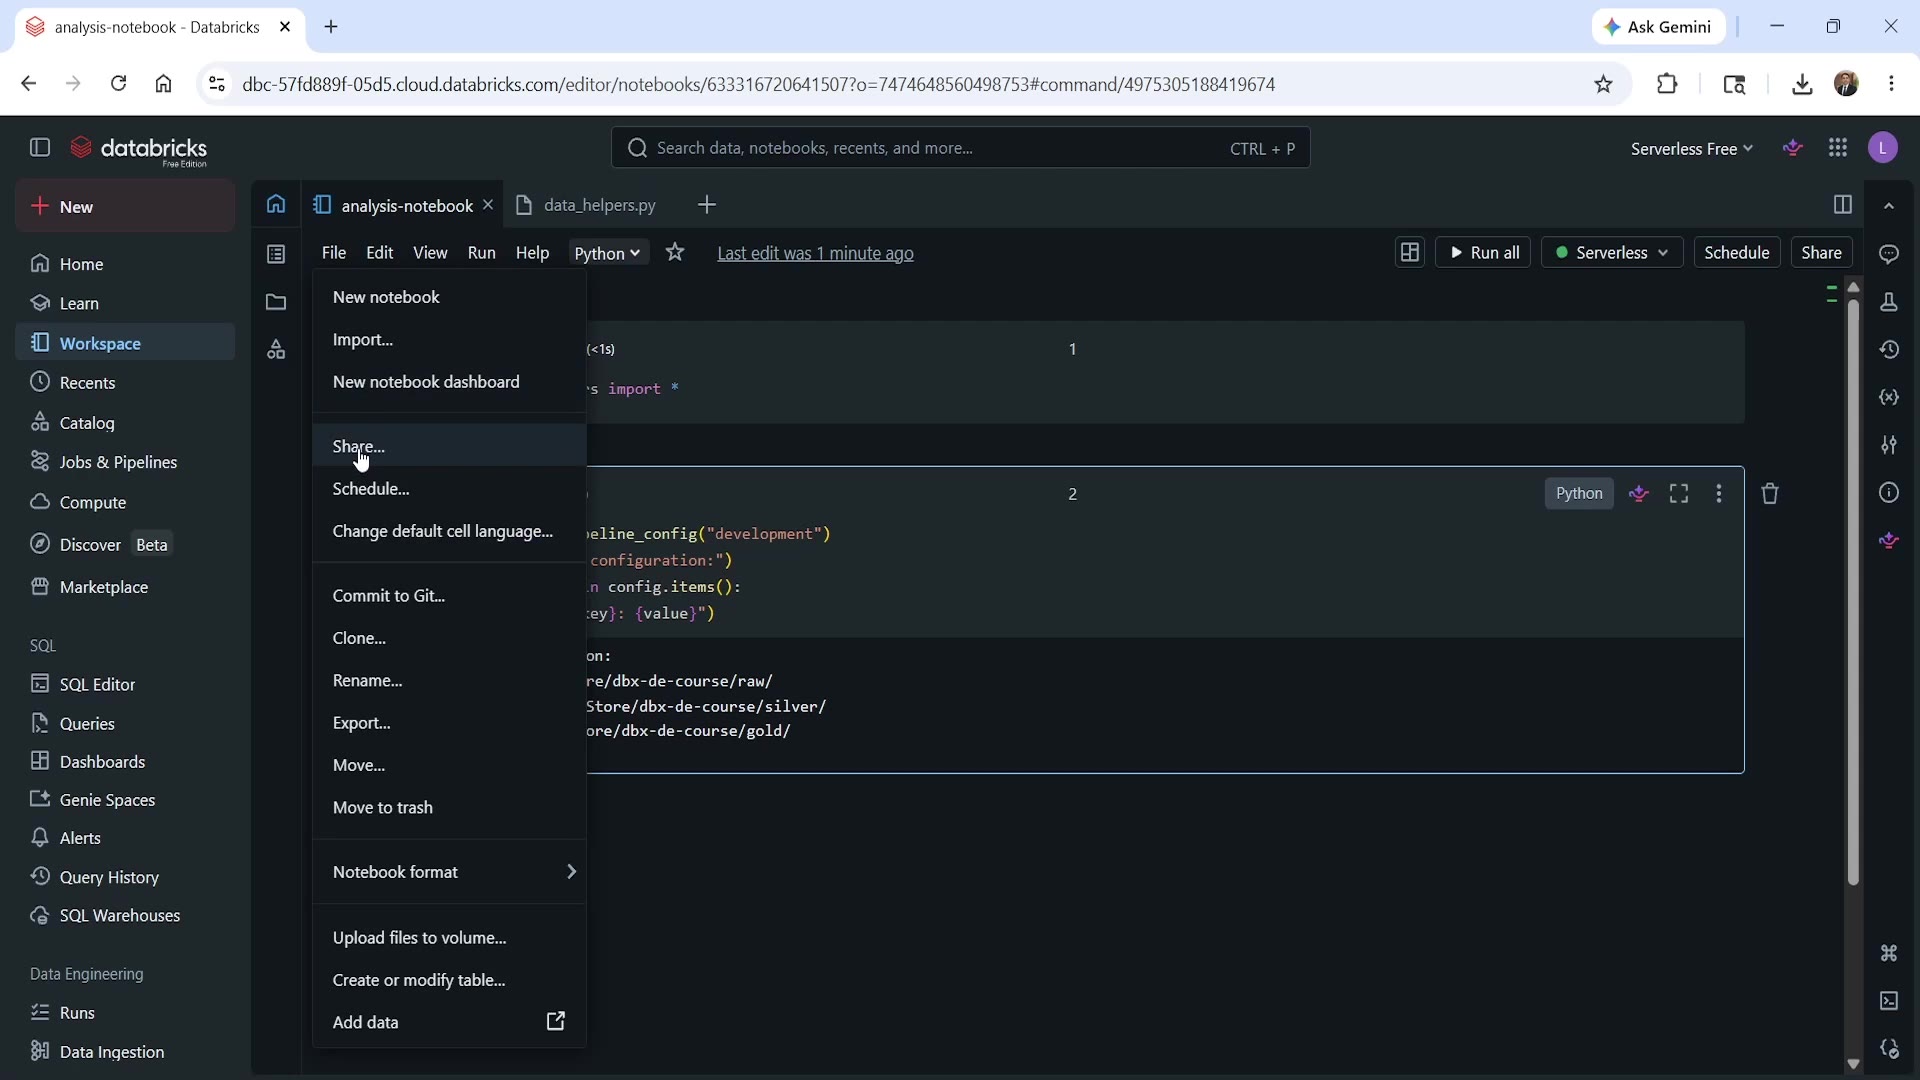 Workspace file menu — no Save option
Notice there's no "Save" option anywhere. That's not an oversight — workspace files are automatically saved, whether they're notebooks, Python files, YAML, or anything else. And as we learned earlier, every file also gets automatic version history.
Using the Python File From a Notebook
Since data_helpers.py is a plain Python file (not a notebook), we can't use %run to bring in its contents — that's specifically for notebooks. Instead, we use the standard Python import syntax:
pythonfrom data_helpers import *
Run this, and all three functions from data_helpers.py become available in the notebook. For example:
pythonconfig = get_pipeline_config("development") print("Pipeline configuration:") for key, value in config.items(): print(f"{key}: {value}")
This works exactly like importing any Python module — because that's precisely what it is.
Sharing Workspace Files
Workspace is a multi-user environment — your whole team can work in it, each with their own permissions. By default, your files are private to you, but you can share them: from the File menu, choose Share, pick users or groups (or share with all workspace users), and assign permissions like Can Manage, Can Edit, Can Run, or Can View.
The Catch: What Workspace Files Don't Give You
Workspace files are great for quick, exploratory, or learning work — but they lack some things that matter for real, production-grade projects:
- No source control features — you can't commit, checkout, or let multiple people work on the same file with proper conflict resolution.
- No CI/CD integration — you can't plug workspace files into automated build/test/deploy pipelines.
- Risk of data loss — if you delete your workspace or close your account, and you haven't exported your files elsewhere, they're gone for good.
Bottom line: workspace files are fine for proof-of-concept work, small exercises, and learning — like what we've been doing throughout this course. For real production work, you should use Git Folders instead.
What Are Git Folders?
Git folders let you connect your Databricks workspace directly to an external Git repository — hosted on GitHub, GitLab, Azure DevOps, Bitbucket, or similar. Instead of files living only inside Databricks, they live in your actual Git repo. Databricks clones that repo into your workspace, and you can pull, branch, commit, and push — all without leaving the workspace UI.
This is what makes the Databricks workspace a genuine software engineering environment: your notebooks and Python files become real source code, going through pull requests, code review, and automated deployment — just like any other codebase.
Setting Up a Git Folder
You'll need a Git repository to connect to. Go to your workspace home, and choose Create → Git folder.
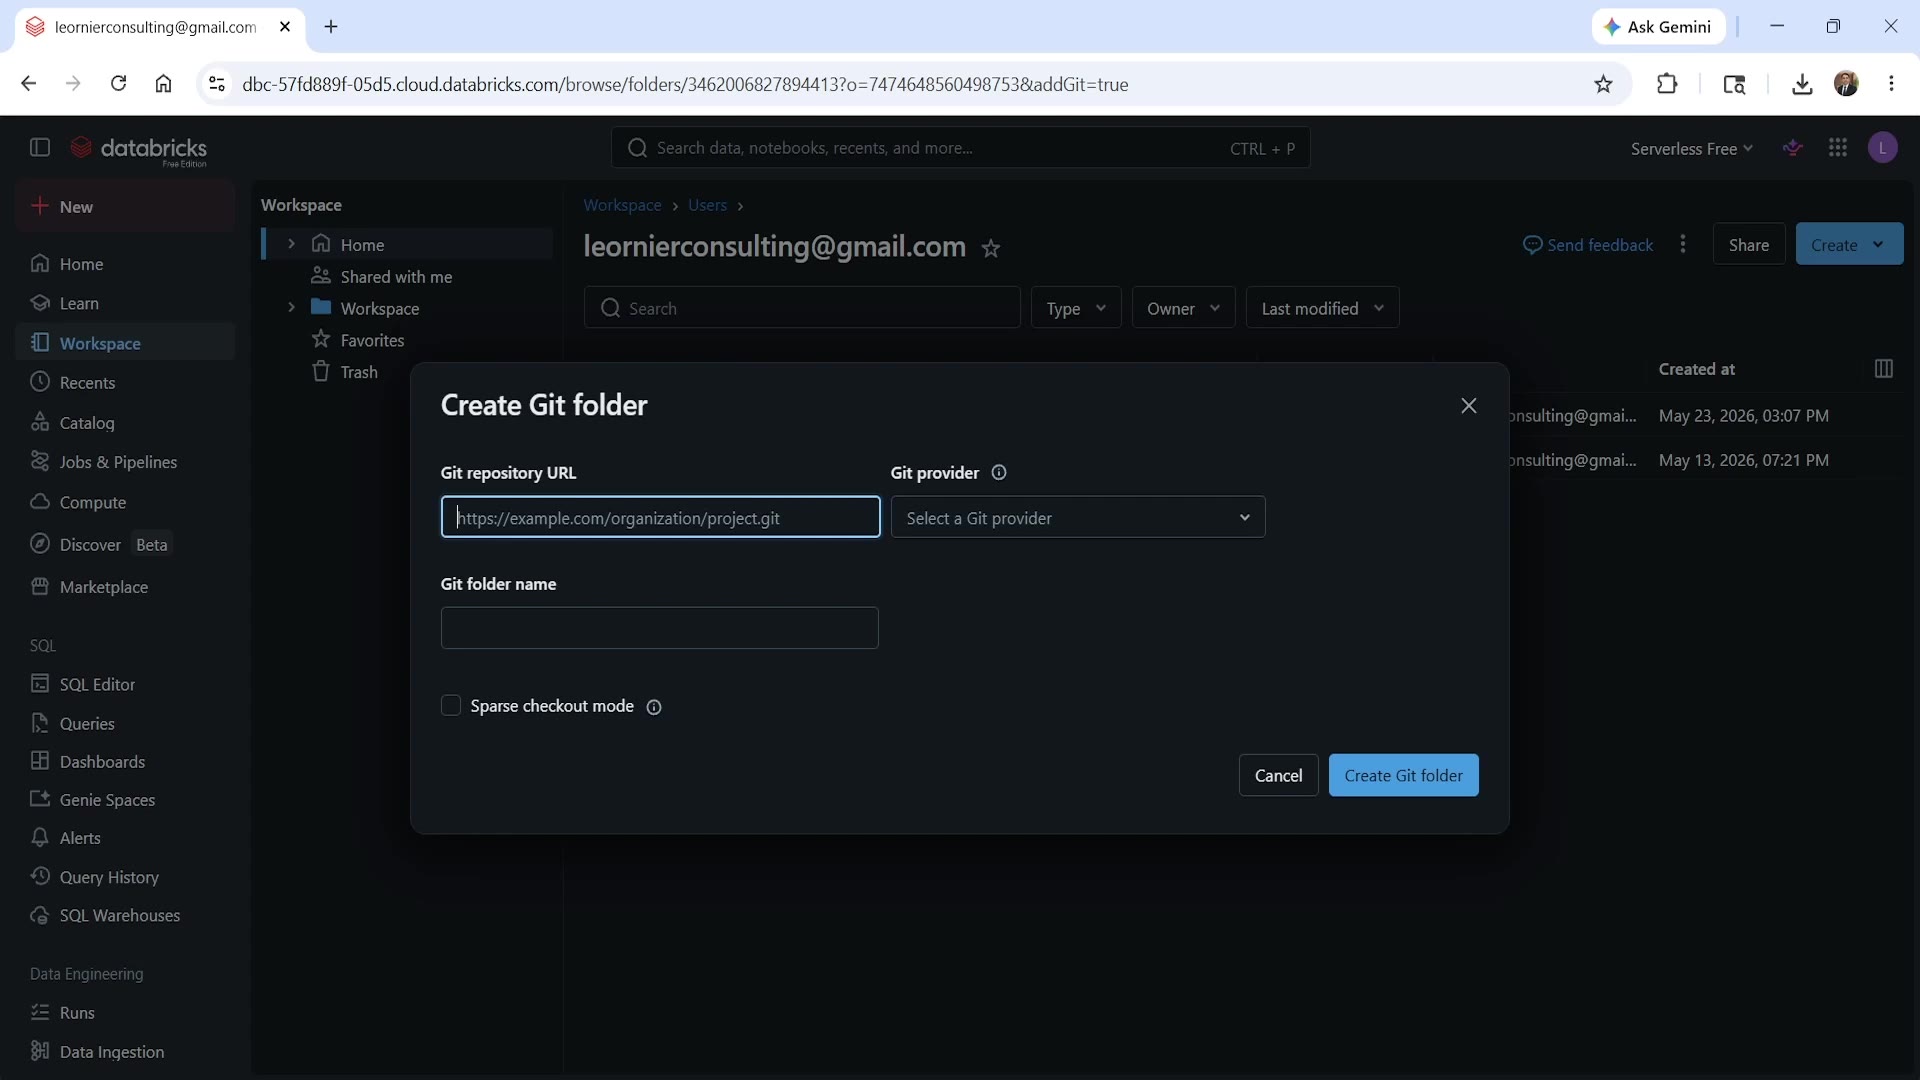 Create Git folder dialog
You'll need to provide:
- Git repository URL — grab this from your repo (Databricks auto-detects the provider — GitHub, GitLab, etc. — from the URL).
- Git folder name — what you want to call this folder in your workspace (this can default to the repo name).
Click Create Git folder. Since this is likely a private repository, you'll be prompted for authentication. Databricks supports two approaches: linking your Git account directly, or using a Personal Access Token (PAT) — the recommended method.
Creating a Personal Access Token
To generate a token, go to your Git provider's Developer Settings (on GitHub: Settings → Developer settings → Personal access tokens → Tokens (classic)), and generate a new token:
- Give it a note/description.
- Set an expiry (e.g., 7, 30, or 90 days).
- Select the
reposcope — that's sufficient for this use case.
Copy the generated token, then back in Databricks, provide:
- A credential name (a label for this saved credential).
- Your Git provider email (linked to your Git account).
- Optionally, your Git provider username.
- The token you just generated.
Save it — Databricks stores this credential securely for future use, so you won't need to re-enter it every time.
Once authenticated, your Git folder is created and the repository is cloned into your workspace. You'll see a small branch indicator (e.g., "main") next to the folder, confirming it's Git-connected — this is how you visually tell a Git folder apart from a regular workspace folder.
Working With a Git Folder
Since this is a real Git repository, all the Git operations you'd expect are available directly from the Databricks UI: creating branches, committing, pulling, pushing — the works. If you're not deeply familiar with Git operations yet, don't worry — we'll pick up more of this as the course progresses.
Moving Work Into the Git Folder
You can drag your existing work — like our exercises folder — directly into a Git folder. This moves the files there (not a copy), so they now live inside your Git-tracked project.
Committing and Pushing
Once you've made changes, check your Git folder's Changes view — it lists exactly which files have been modified:
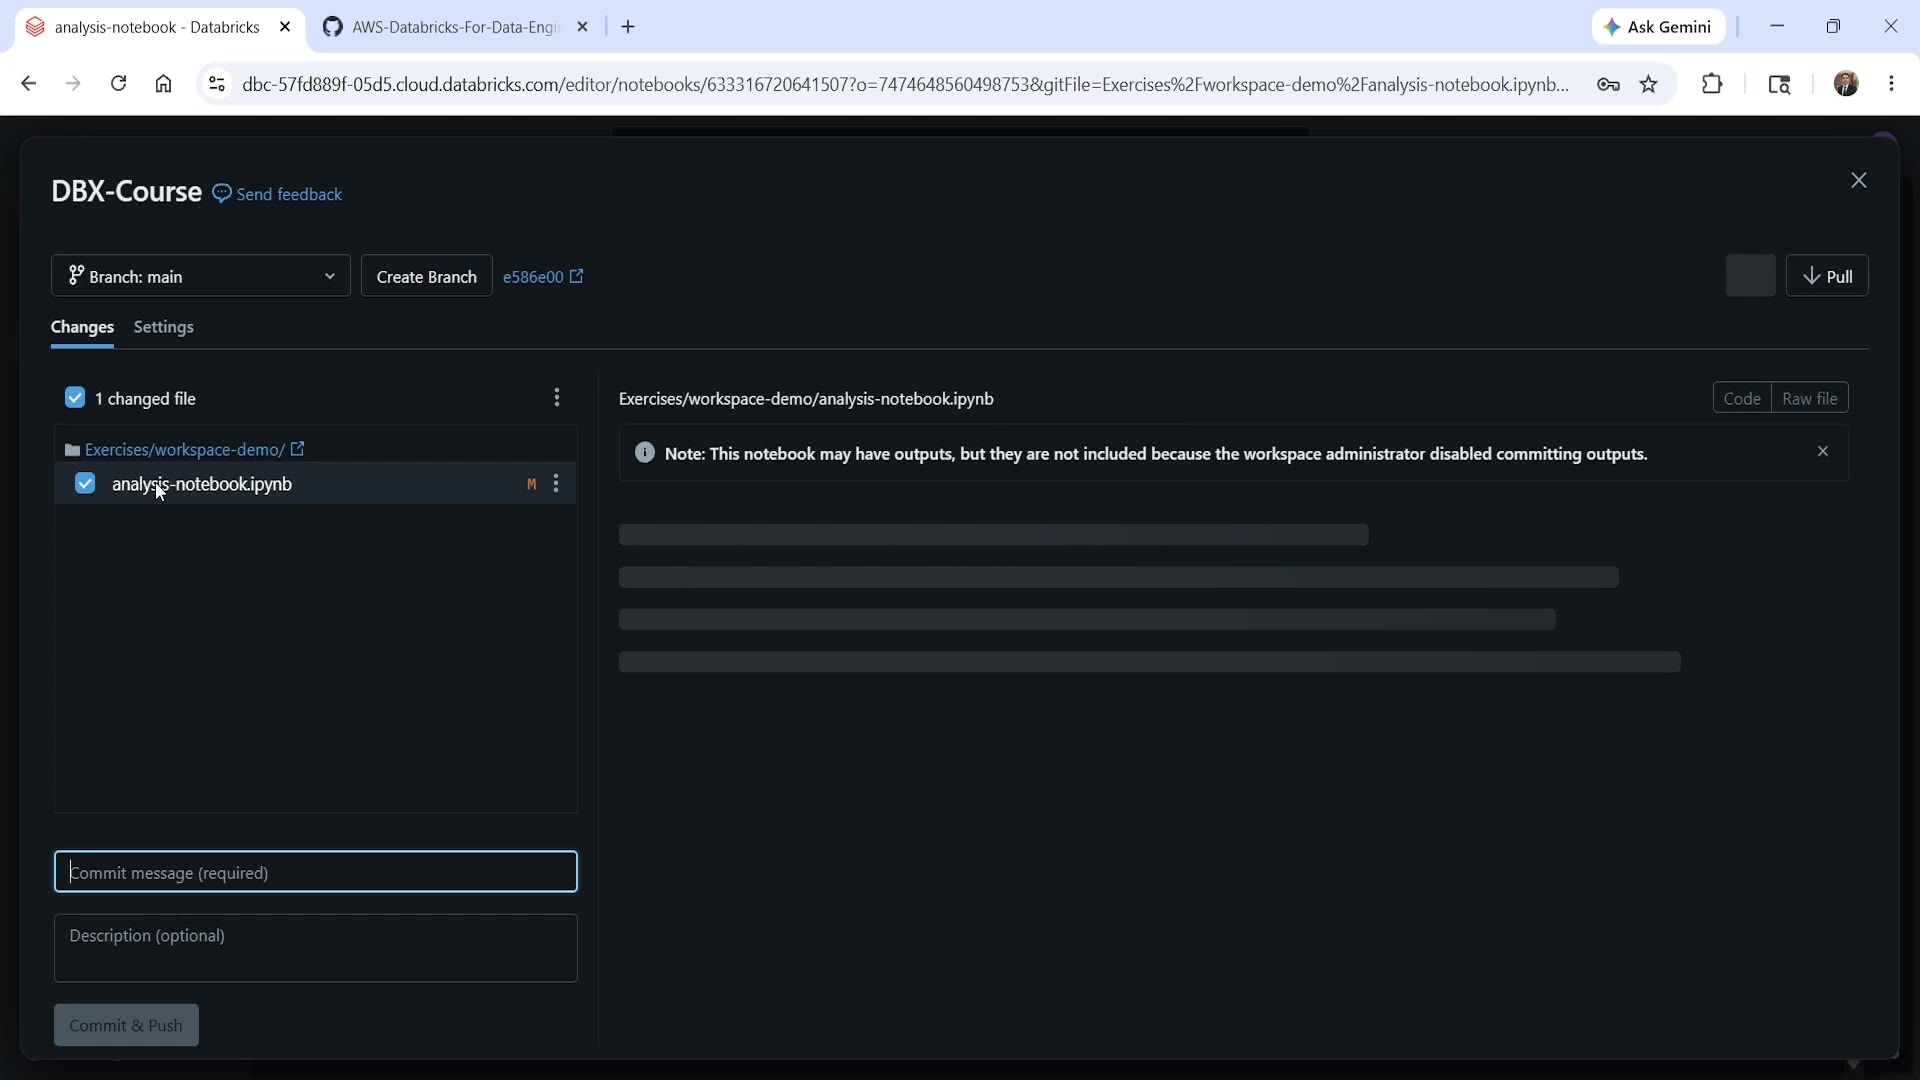 Commit and push interface with file diff
You'll see the list of changed files, a diff preview of what changed, and fields for a commit message and optional description. Fill these in, then click Commit & Push — and your changes go straight to your remote Git repository.
You can verify this by checking your repository directly on GitHub (or wherever it's hosted) — your files, folder structure, and notebook content will all be there, exactly as committed.
Iterating: Making More Changes
The same flow repeats every time you make changes: edit a file (say, add a new cell to a notebook), test it, then go back to the Git panel — it'll show you exactly what changed, in a clear code/diff view. Add a commit message, and Commit & Push again.
Pulling Changes
If someone else on your team has pushed changes to the same repository, use Pull to bring those changes into your workspace copy — keeping everyone in sync.
Summary
| Workspace Files | Git Folders | |
|---|---|---|
| Storage | Directly inside the Databricks workspace | Cloned from an external Git repository |
| Auto-save | Yes, automatic | Yes, automatic (locally) — but changes must be committed to persist in Git |
| Version history | Basic, built-in Databricks versioning | Full Git history — branches, commits, PRs |
| Collaboration | Sharing with permissions (view/edit/run/manage) | Full Git collaboration — branches, pull requests, conflict resolution |
| CI/CD | Not supported | Fully supported |
| Risk if workspace is deleted | Files are lost unless exported | Safe — files live in your Git repository |
| Best for | Quick experiments, learning, proof-of-concept | Real projects, production-grade development |
The takeaway: use Git folders for real projects and production-grade applications, and workspace folders for experimentation, learning, and ad hoc work — exactly like we've been doing throughout this course so far, before now moving our work into a proper Git folder.
See you again. Keep learning, and keep growing!